Entertaining, Food, Home

How to Make Emoji Rice Krispies Treats

Hi all! I’m back with some more creativity in the kitchen. Emoji Rice Krispies Treats! (Just look at how good they came out. Believe me, I’m more shocked than you are!)

Sue at Home Emoji Rice Krispie Treats main

Before we get started, I need to give major props to Mister Krisp who is the one-and-only inspiration for this project. If you don’t know about her — and yes, this Mister is a her — Jessica Siskin is a NYC-based writer who just happens to make amazing dessert art with Rice Krispies treats. She has a huge following on Instagram and one of her most famous projects is her emojis. (While you’re checking out her Instagram, be sure to note her Rice Krispies tacos,  her Rice Krispies burger and oh yeah, her Rice Krispies Drake. I figured the emojis would be a great project for me and the girls to make to take to a barbeque today. (Shout out to Kelli and Rob!)

Sue at Home Emoji Rice Krispie Treats ingredients

The ingredients you’ll need are: 6 cups of Rice Krispies cereal, 3 tablespoons of butter, a 10 ounce bag of marshmallows, yellow food coloring, Pam cooking spray and frosting in the following colors: black, white, blue, red and pink. I bought tubes of Wilton decorating icing in black and red and then made a quick mini batch of white icing and used food coloring to make the other colors. (Note: I do NOT recommend the Wilton Ready-to-decorate cans. The frosting comes out too fast and it’s very hard to control.) For supplies, you’ll need a round cookie cutter and a Wilton #3 round piping tip. (If you want blush on some of the blushing emojis, you’ll also need red food coloring and a foam brush.)

The Rice Krispies treat directions are right on the cereal box: you melt the butter in a big saucepan on low, then add the marshmallows. As they melted, I added about 5-6 drops of yellow liquid food coloring to get the emoji color.

Sue at Home Emoji Rice Krispie Treats melting

Then you remove it from the heat and stir in the Rice Krispies. We laid wax paper on cookie sheets (just to protect the table) and dumped the mixture in the middle. Then I used a spatula coated in Pam to spread it out and press it down so it was flat. They should be somewhere between 1/4 inch and 1/2 inch high. I kind of like how fat this one in the front came out and it’s about a 1/2 inch.

Sue at Home emoji rice krispie treats close up

After you’ve got the mixture all spread out (you might need more than one cookie sheet), use the cookie cutter to cut circles. (You can spray it with Pam so it doesn’t stick.) You’ll want to use a flat spatula coated in Pam to lift them. Do not underestimate the stickiness of melted marshmallows! Pam is your friend. Pam is sort of like the most important ingredient in this whole recipe. Use her wisely! In fact, Mister Krisp even advises spraying it on your hands to mold Rice Krispies treats. We did just that and reworked the leftovers into a new layer of Rice Krispies treats to cut from.

Sidenote: On the first batch, I completely forgot the food coloring! We decided to still use some of them (I mean, they taste the same!) even though they looked more like rice cakes. Oops. You can see the difference here.

Sue at Home Emoji rice krispie treats 2 colors

All you have to do after you cut them is pipe on the frosting. I know this may sound daunting but if you’ve ever piped “Happy Birthday Whoever” onto a cake, you can do this. It’s just a series of little half circles and lines, plus some hearts, tongues and teardrops. (I kept this image from Mister Krisp up on my laptop as I worked.)  I don’t have any shots of me actually piping it because my assistants were totally over me at this point but here’s my advise: keep the piping tip close to the Rice Krispies treats, move slowly, and squeeze hard. As long as you stay close and go slow, you can’t screw it up.  If I ever make this again, I’ll invest some more tips because the biggest annoyance was taking the tip off and washing it before starting the next color. Here’s a process shot with just black and white icing.

Sue at Home Emoji Rice Krispie Treats black piping

But they really come to life once the other colors are added!

Sue at Home Emoji Rice Krispies 4 vert

Some of them, like the little guy on the bottom left below, call for blush. I couldn’t find a tutorial from Mister Krisp so I just figured it out on my own.

Sue at Home Emoji Rice Krispies 4.2

I used some blood — just kidding! — but seriously, doesn’t it look like blood? It’s actually red gel food coloring. I put a little on a plate and used a foam brush to just dab a little color onto his cheeks. Just be sure to blot it A LOT on the paper plate before putting it on the emoji. I think it worked out pretty well for those little shy guys!

Sue at Home Emoji Rice Krispie Treats blush collage

It was an easy, though somewhat time-consuming, project that looks a lot more impressive than I thought it would!

So, tell me…what’s your favorite emoji? I probably use the smooch lips the most because I “speak emoji” with my kids more than anyone else but I am partial to the wink and the heart eyes too!

Hope you’ll try this fun project!

XO

Sue at Home

Sue at Home Emoji Rice Krispies Treats Pin

Entertaining, Food

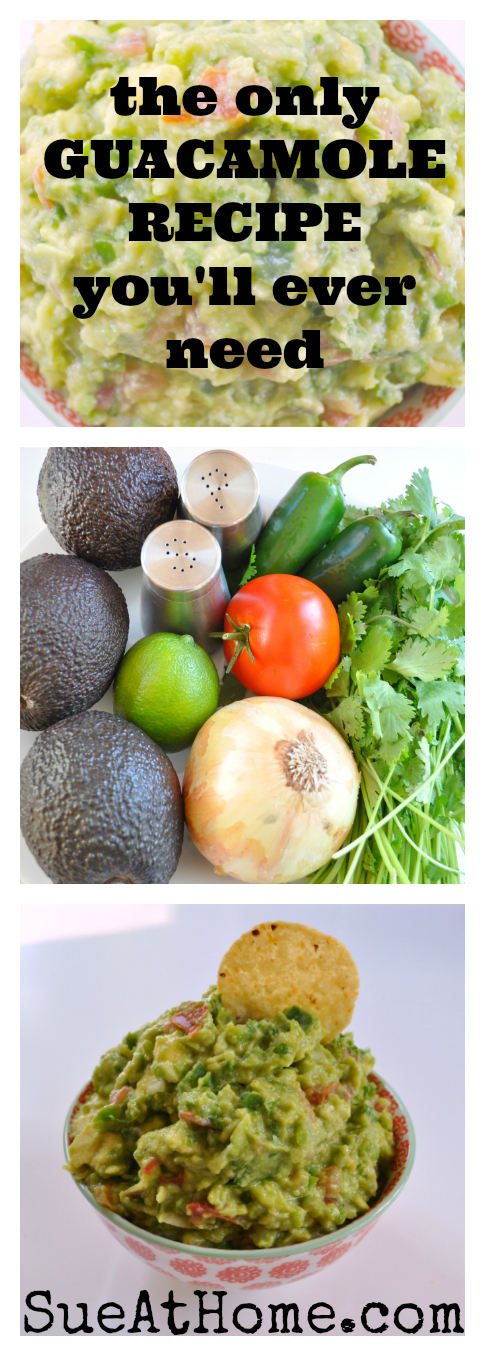
The Only Guacamole Recipe You’ll Ever Need

Sue at Home Guacamole with chip

dormify_posters_summer15_allicareaboutisguac

Okay, maybe not just three people but I do admit I have a pretty serious obsession with guacamole. In fact, I’ve made it my life’s work to perfect my guac recipe. And today I’m here to share it with you beautiful people. (By the way, that print above is a poster from a site called Dormify and I might have ordered it if it wasn’t from a site called Dormify.)

Now don’t think you’re going to get some secret ingredient here because my recipe is pretty basic. But with the right ratios of those basic ingredients, I think you’ll agree that this guacamole is pretty special.

I know I sound like I’m tooting my guacamole horn but I get requests to make guac for just about every party I go to but I recently had such a nice compliment that I figured this post was far past due. It all started when I made it for Sophia’s end-of-the-season soccer party and a bunch of people at the party asked for the recipe. Then a few weeks into the summer, I got this text from one of my fellow soccer moms: “Huge shout out to you for the guacamole recipe. I have made it 4 times for different events/people and everyone LOVES it. Thank you!!!” (So you can all thank Donna for her compliment because it made me finally get around to writing this post.)

Sue at Home guacamole ingredients

I meant to share this recipe with the Sue at Home readers years ago but…I ate it. No — seriously. Back in 2012, I photographed every step of the chopping process but then once it was in the bowl, it disappeared so quickly that I never got a shot of the actual finished product. Oops. Luckily, I got some shots this time before I inhaled it so let’s get down to business, shall we?

First off, you’ll need 5-6 ripe avocados. Don’t even attempt this recipe if your avocados aren’t ripe because you’ll waste your time and end up with crappy guacamole. (And it won’t be my fault.) I get mine at Whole Foods because I like to bleed money  they always have ripe ones. The rock-hard avocados that most stores sell won’t be ripe for about 6 days…and who wants to wait that long for guacamole?

Sue at Home Guacamole avocado and knife

You’ll need 1 or 2 vine-ripe tomatoes. I usually take most of the guts out but I leave a little to keep it juicy. Chop ’em up but don’t worry about getting them too small.

Sue at Home guacamole tomato

Most guacamole recipes call for red onions but since they’re disgusting and they repeat on me, I use spanish or vidala onions. Just a half an onion chopped up should do it. Now is a good time to mention that I use one bowl for the good stuff and one bowl for the junk because it makes me feel like I have my own cooking show. Oh — and my bowls are from Anthropologie (similar here) but you probably already knew that because I used them in the rainbow cake post.

Sue at Home Guacamole onion

Next up is the divisive cilantro. I know some people don’t like it. (In fact some people are even genetically predisposed to think that it tastes like soap. If you think I’m kidding, you’ve got to read this article in the New York Times. Apparently, even Julia Child hated the stuff.) But the recipe isn’t quite the same without it so just hope that you don’t have any of those cilantro haters in your audience. Grab a big handful off the bunch and chop it up. Technically, you’re supposed to pull the leaves off the stems but I never do and I’ve never had a complaint.

Sue at Home Guacamole cilantro

To give your guacamole a little kick without lighting your guest’s mouths on fire, a few jalapeno peppers should do the trick. This is one part of the recipe that has evolved over the years. I used to use one jalapeno, then two. Now I’m up to three or four. As long as you take the seeds out, the jalapenos will just add some nice flavor without too much heat. Just be sure to really mince them so your guac doesn’t have huge chunks of jalapeno. A couple tips: Cut the top off and then make a few little slices down the side with your paring knife. (See below) Then you can slide the knife in and separate the guts from the outside without getting seeds all over the place. And also — scrub your hands like crazy after handling jalapenos because if you don’t and you’re a contact lens wearer like me, your fingertips will burn your eyeballs like the depths of hell. (You’ve been warned.)

jalapeno

Sue at Home Guacamole jalapeno

I like my guacamole nice and citrusy so I use the juice of a whole lime. Can’t you practically hear Tom Colicchio saying that my guacamole has “good acid”?

Sue at Home Guacamole lime

Two more things — which just might be the most important ingredients of all — salt and pepper. I’ve never measured the amount I put in but I can tell you that I’m very generous with the salt. Go ahead and mix everything up and then add salt and pepper to taste. I just keep adding salt until I think it’s perfect. (And to those eagle-eyed readers out there — yes, that’s the pepper shaker from the set of shakers we gave out as wedding favors 14 years ago! More on those here.)

Sue at Home Guacamole pepper

Some people slice up the avocados before they scoop them out but I find that they mush up nicely without doing that. Just scoop them out with a spoon!

Sue at Home Guacamole avocado scoop

Of course, this is just a personal preference but I like to serve my guac with Tostitos Bite Size chips. If you use a bigger chip then you end up eating more chip and less guacamole and really…isn’t the guacamole the star, here?

Sue at Home Guacamole bowl with chips

You’ll definitely want to make this fresh right before you serve it or your guacamole will turn brown. But if you need to, go ahead and combine all of the ingredients (except for the avocados!) a day in advance and keep them in a closed container in the fridge so all the flavors can party and get to know each other.

Sue At Home’s Only Guacamole Recipe You’ll Ever Need

5-6 ripe avocados 

1/2 spanish onion, chopped

1-2 vine-ripe tomatoes, chopped 

1/2 bunch of cilantro, chopped 

3-4 jalapeno peppers, minced

Juice from a whole lime

Salt and Pepper to taste 

**Serve with Tostitos Bite Size chips

Chop all of the ingredients and stir until mashed and combined. It makes a nice, big, party-size portion but it’ll go fast. (One time my friends ate the whole bowl while I was busy making mojitos. True story.)

Happy Guacamole Making!

XO

Sue at Home

guac collage


crafts, Decor, Entertaining, Home, My house

Spooky Decor

Just in time for our annual Halloween soiree, I finally got the house all spooked out and ready. I started with spiders in the light fixture and a black scarf draped over my painting to make it look a little less pink.

halloween-002

A lot of the decorations were left over from last year, like the little spiders, the tablecloth and the cobwebs. This year, I added lots of Martha Stewart Crafts that another editor gave me at my day job.
halloween-004

All of the wine bottle decorations are from Martha Stewart. You can find them here.  The little owl papers just stick on the front of the bottle. Sophia said they all reminded her of Harry Potter.

halloween-005

For the witchy wine, I combined the sticker from this kit with the witch’s hat from this kit.  My pumpkins are fake ones from Target that I spray painted and glued glitter onto.  (You know I’ll never spray paint a real one again after what happened last year!)

halloween-006

The girls made the creepy hands at an event at Sophia’s school. They’re just medical gloves filled with flour.

halloween-007

My favorite of the wine bottle decorations was this awesome vampire collar. We added fangs from the photo decor kit too.

halloween-008

Sophia made the striped planter at the Y.

halloween-009

Those ghosts in the back are the party favors for the kids. I just trimmed plain white lunch bags to have a ghost shape on top and Soph drew on the eyes.

haloween-010

My glitter skull from last year is sitting on the front windowsill surrounded by brass candlesticks. (And of course, some pretty carnations. They’re my go-to party flower because they’re cheap, pretty and they last a loooooong time.)

halloween-016

The girls colored pumpkins with metallic paint pens in lieu of carving.

halloween-017

Our front foyer table holds this little glass pumpkin (another Target find) filled with lots of essential Halloween toys like glow-in-the-dark teeth and spider rings. (Because you can never have enough spider rings!)

halloween-018

A little ghost that Lily made in pre-K last year hangs out in the den on top of a bowl of shells. Sometime between last Halloween and now, he lost an eye. But I think it’s a good look for him so we’re going with it!

halloween-020

I also did a couple of the Halloween crafts featured in the October issue of Ladies’ Home Journal so I can talk about them for an upcoming TV appearance on Better TV. This is all day job stuff but I’ll let you know when it’s airing. (Follow Sue at Home on Facebook to hear all about it!)

halloween-028

Up in Sophia’s room, she had a blast spookifying her place with this photo kit from Martha Stewart.

halloween-031

Of course, that was before she switched her costume a few minutes before the party. As I told her the first time she changed her mind about her costume, “You can be whatever you want as long as you can put it together from things in this house.” I’m happy to help buy/build/hunt for costumes but not when she changes her mind two days before Halloween! (BTW: She’s a cat–obviously–and Lily is Chee Chee from Teen Beach Movie. When I posted this picture on Instagram, I tagged Chrissie Fit, the actress that plays Chee Chee, and she liked my picture! It’s scary how excited that makes me but you need to understand that this movie is like an Oscar-caliber film in my house and Chrissie Fit is like our Meryl. I don’t even think the girls understand how cool it is!)

Halloween-049

And when they’re not being as cute as can be, they can turn up the spook and scare the crap out of you too!

Halloween 2013 BLOG

XO

Sue at Home

Entertaining

A Nautical Party

No no. I don’t have a mystery son that I’ve never told you about. This post is about an adorable party that our friends threw for their son Leo’s first birthday. Leo’s mom, Carrie, did such a great job curating lots of fun nautical themed details (mostly from Etsy sellers!) that I just had to snap a few pics on my phone and create a post for you. You’ll find all of Carrie’s resources throughout.

The party was held in the cutest (and yummiest) pizzeria in Hoboken, Dozzino.

leo-photo (37)

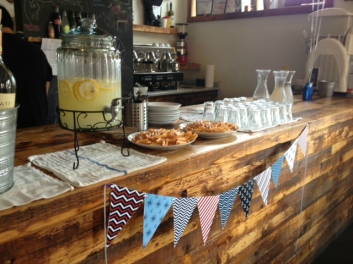
Carrie got the pennant from Etsy seller Subway Party. It’s an instant download so she had to print, cut and string it.

leo-photo (39)

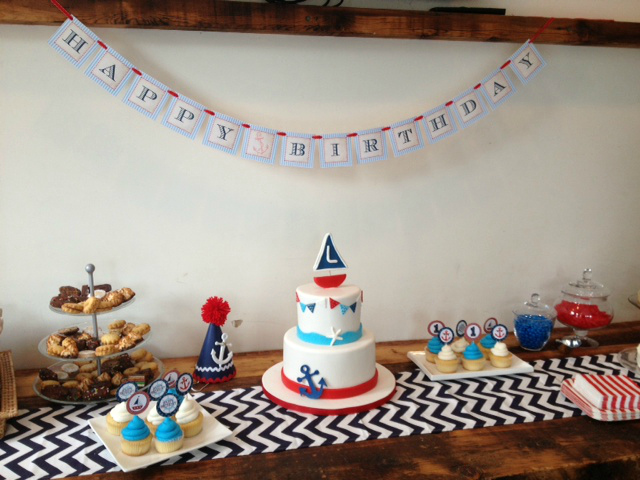
Dozzino has long farmhouse tables where guests sit family style (ie: When you go there, you’re sitting with strangers. Embrace it.) but since Mike and Carrie rented the whole restaurant, Carrie used one of the tables as a dessert display.

Happy Birthday Banner: Etsy seller Cutie Putti Paperie

Chevron runner: Etsy seller Fantasy Vintage Bridal

leo-photo (69)

My kids may or may not have OD’d on those swedish fish in the candy jar!

Candy jars: Michael’s

Picture frame: Oriental Trading

Smash cake: Lovingly made by grandma!

Pennant on the smash cake: Same download as the big one above! Etsy seller Subway Party

leo-photo (68)

Aren’t these simple plates and napkins just perfect?

Plates and napkins: Oriental Trading

leo-photo (60)

Little picks from Etsy seller Chelsea Lee Designs decorated the cupcakes from Hudson Cakery.

leo-photo (59)

Of course, Leo had his own personal birthday hat from Etsy seller Prop Shop Boutique.

leo-photo (58)

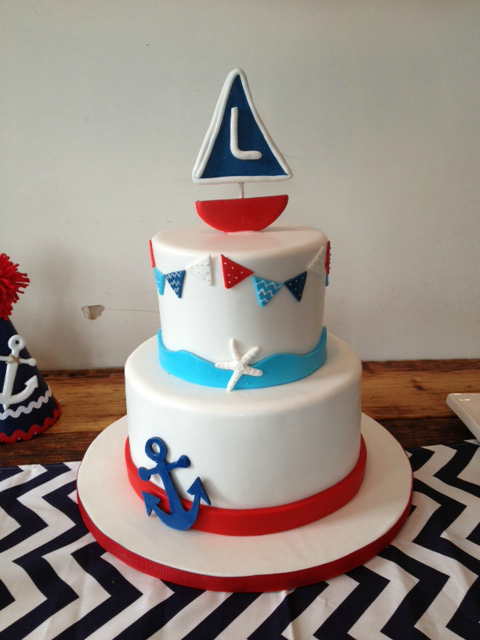
The cake (also from Hudson Cakery) was so cute…

leo-photo (57)

and totally delish! (Hello, fresh strawberries!)

leo-photo (33)

Carrie’s been taking monthly (or probably more like hourly!) pics of Leo since he was born so of course, they had to display the whole year. She found the banner, which came assembled, from Etsy seller Stampin Fanatic.

leo-photo (50)

The party favors didn’t disappoint. Can you believe she got the great bags from Oriental Trading?

leo-photo (56)

The bag tags were another printable from yet another Etsy seller: Jen Leonardini.

leo-photo (54)

 Lily did not like me swiping her party favor just to take a still life shot but I did it for you, people. Don’t worry, she got to eat her gummies and Goldfish.

leo-photo (11)

I would be missing part of the story if I didn’t mention the delicious food we ate for lunch. Dozzino served simple green salads, bruschetta and “spesto” (spinach pesto) crostini.

leo-photo (53)

leo-photo (49)

And the pizza. Ohhhhhhh the pizza. Of course, there was the classic margarita pie but this white spinach version was quite possibly the most delicious pizza I’ve ever eaten. (Disclaimer: I should note that I am currently on Weight Watchers so maybe I was just so crazy about it by comparison. But don’t knock my beloved Weight Watchers. I get to eat just about anything I want as long as it’s in moderation. And believe me, watching my intact of this pizza was hard!)

leo-photo (29)

Carrie and Mike did such an amazing job with the party but the cutest, most adorable, and totally delicious thing there was Leo himself!

Happy Birthday Leo!

XO

Sue at Home

crafts, Entertaining, Family, Home

Luau Birthday Party

We recently celebrated Lily’s 5th Birthday with a luau at our house. Let’s take a peek at how we put it all together.

As you saw in last week’s post, I created an umbrella wreath for the front door out of paper parasols.

wreath-154

 I bought two hibiscus plants that I put in some pots that I had painted last year.

luau-125

They added the perfect tropical touch.

luau-126In the foyer, I put tons of leis in a bucket and displayed the invitation that I made on PicMonkey.

luau-118

For the favors, I got sunglasses from The Children’s Place, some Swedish Fish (Lily loves “sweetest fish”!) a hibiscus tattoo, and either a Hello Kitty necklace for the girls or a foam plane of the boys (both from the One Spot at Target).

luau-250

I just put all the goodies into white paper bags and added a little tag–that said “Thanks for coming to Lily’s Luau”– thanks to Picmonkey again. (I “borrowed” some of Sophia’s fun tape to attach them to the bags.)

Some grass skirts for the girls were laid out the back of the couch so kids could grab them as they came in.

luau-122I usually don’t like a matching set of paper plates but when I saw these at Ikea, I had to have them. I got the straws eons ago at Pottery Barn outlet and they’ve been sitting in a party bin in the attic just waiting for a luau!

luau-176

I kept the food pretty simple: pizza for dinner, tortilla chips and homemade guacamole, and lots of fruit. I had to include some pineapple, of course! (more cute napkins from Ikea)

luau-109

As for the cupcakes, I made them at home and used blue frosting to represent water, crunched up graham crackers for sand, gummy flip flops and a paper parasol.

luau-105

luau-106

I pulled out all my cake stands and decorated some of them to look like they had grass skirts on.  I just cut up a piece of green craft paper and taped it all the way around. Then I cut apart one of the leis and glued flowers around the paper with fabric glue.

luau-098

I also wrapped one of the cake stands with a lei.

luau-096

The little tissue paper decorations are from Oriental Trading –where I got just about everything I needed–and they came in really handy to give some height to the cupcake displays. (I just stuck them on top of a plastic cup turned upside down.)

luau-101

As for activities, we kinda just winged it. I was nervous because we don’t have a swingset anymore (remember how I told you that Hurricane Sandy took it out?) But we just put out all of our frisbees, wiffle balls and bats, and bubbles and let the kids have fun in the yard.  They loved it and there wasn’t a dull moment.

It was a perfect day with lots of good friends, good food and drinks, and good times!

Happy 5th Birthday Lily!

XO

Sue at Home

crafts, Entertaining, Family, Home

40 Envelopes with 40 Memories for a 40th Birthday

birthday-460

Yup. It’s that time again…the Pinterest Challenge. And this time, I created a project for Pablo’s 40th celebration. (Maybe next time, I’ll do something for myself!) When I saw this birthday envelope surprise on Oh Happy Day I knew it was the perfect way to present Pablo with the sweet notes that I was planning for his birthday.

37

The first step was to get the memories. Lucky for me, Pablo is very loved so even though I started this the day before his birthday (!), all I had to do was send one group message on Facebook and one group email for the non-Facebookers and the memories came flooding in. There were a few people I couldn’t find but I managed to get over 35 messages. (I simply asked everyone to send me a memory of a time they spent with Pablo. I filled in the last few from me and the girls.) Once I got them all, I cut and pasted them into a word document, formatted them, and printed them on bright colored paper. Some were long and some were short but that worked perfectly for my purposes.

birthday-466

Next I found some random envelopes in my stationary stash and laid them out to spell 40. First on the floor (to get a layout I liked) and then up on the wall of the dining room.

birthday-459

The girls helped me stuff the envelopes…
birthday-427

…until each envelope – all 40 of them! – had a personal note from a friend or relative.

birthday-424

When he came home and we surprised him with it, he was a little perplexed at first. (I think he may have been wondering if this was a permanent installation!)

But once he started reading through all the memories with the girls (with a little bit of editing to take out any mature subjects!), he loved it.

birthday-447

I think it was a perfect gift for him (because he loves reminiscing) and for this year (because with me working part time now, there are no extra funds for a grand gift so I needed to make a grand gesture instead.)

We did get him a few little goodies, though, because everyone needs to open some gifts on their birthday.

birthday-434

birthday-451

As you can see, he had a great time. Thanks to everyone who contributed memories to this project. I couldn’t have done it without you.

Thanks for reading! 

Sue at Home

P.S. Thanks so much for visiting Sue at Home and reading this post. I wrote it back in 2013 and it’s now been viewed over 60,000 times! If you enjoyed reading about my creativity and want to see what I’m up to now, check out Libby & Smee, my handmade line of simple fun statement jewelry! And be sure to use coupon code SUEATHOME10 for 10% off your first order at libbyandsmee.com !