Libby & Smee

What is Libby & Smee?

You may have come here for the DIY projects that I used to feature on Sue at Home and thought, uh…where am I? But don’t fret! It’s still me, Sue Erneta, the creative fashion-loving mom, and I’m still here at my home in a suburb of NYC. But today, I’d like to welcome you to the world of Libby & Smee!

I created Libby & Smee, my handmade line of simple fun statement jewelry, a few years ago after spending 20 year as a magazine fashion editor. It all started with a pair of DIY green tassel earrings. I knew I was on to something because people always stopped me when I wore them. On a whim, I walked into a small shop in my town and before I could even ask the shop owner if she was interested in carrying them, she looked up and said, “I love your earrings”!

IMG_3538

An Etsy shop and a couple more wholesale accounts soon followed and today Libby & Smee is worn all over the world. I have made and sold thousands of hoop earrings, beaded bracelets, and choker necklaces and I’m proud to say that Libby & Smee is still a one-woman operation.  You can shop the line at libbyandsmee.com and be sure to subscribe to my newsletter (and get a coupon code as a thanks!) by clicking here.

JA18_DITL_SueE_Portrait_0118 small

The name Libby & Smee comes from my daughters’ initials (LBE and SME) and they are the heart and soul of everything I make. I love having a challenging yet flexible career that keeps me at home so that I can be more involved in their lives. (As much as they’ll let me!)

I’m looking forward to using this space for fashion inspiration, behind-the-scenes info and everything Libby & Smee-ish! What do you want to see posted here? Let me know!

XO

Sue at Home for Libby & Smee

Sue at Home is the lifestyle blog created by Libby & Smee founder, designer, and maker Sue Erneta. To shop Libby & Smee’s simple fun statement jewelry, visit libbyandsmee.com 

Photo of me by Shannon Greer for WW Magazine.

crafts

How to Make a DIY Starbucks Latte Halloween Costume

I live by the motto that it’s never too early to start thinking about a Halloween costume. Even if you don’t share my passion for the one day of the year when dressing up like a weirdo is totally celebrated, you can’t deny that stores have started stocking black and orange decorations. And costume catalogs are probably flooding your mailbox as we speak. So, I figured it was about time I shared a how-to on S’s costume from last year: A Starbucks grande iced pumpkin spice latte with whipped cream!

latte (1)

I already had an old slip and headband so the costume cost us less than $10 in felt and hot glue! When we were searching for ideas last year, we found lots of cute pictures (this blog post was our big inspiration) but there was no resource that really explained how to create the Starbucks logo and how to use felt to create the foam/whipped cream. But now, thanks to this blog post, there is!

You’ll need a tan dress (I had an old slip that fit S loosely but these cheapies from Amazon are a great option), a plain headband, 2 one-foot square pieces of dark green felt, white felt (enough to make at least six 9-inch circles and eight 3.5-inch circles), felt glue, a black Sharpie (to write the “order” on the back of the “cup”), a hot glue gun, and whatever you want to wear underneath.

Search for the Starbucks logo online and make an enlarged print about 7 inches in diameter. To make the traceable template, you’ll need to cut it out. This will be super annoying and time-consuming and you’ll get carpal tunnel but just think about how awesome your costume is going to be and deal with it. Plus…good news! Since it’s symmetrical, you can cut half of it and just flip it over when tracing. (Be sure to have a bowl of mini pumpkins nearby to help you get in the holiday spirit!)

Sue at Home Starbucks Latte Costume tracing 1

Use a black Sharpie to trace around the design.

Sue at Home Starbucks Latte Costume tracing 2

Then flip your template over to trace the other side.

Sue at Home Starbucks Latte Costume tracing logo felt

Next step: Stop and marvel at how good it’s looking!

Sue at Home Starbucks Latte Costume tracing logo

Then — yup, you guessed it — just when you’re starting to get feeling back in your hand, more cutting! Once you’ve got it all cut out, glue down each part of the design with felt glue. (Felt glue is easier and less messy than hot glue so it’s best to use felt glue for this step.)

Sue at Home Starbucks Latte Costume felt

Soon it’ll look like this and all will be right with the world. (Don’t forget the nose, mouth and the little triangle in the middle of the crown.)

Sue at Home Starbucks Latte Costume layered felt

Then cut out the circle and you’re ready to glue the logo on the front of the dress. Just make sure you put it down low enough so you have plenty of room for the foam/whipped cream across the top.

sue-at-home-starbucks-latte-costume1 (1)

To make the whipped cream you’ll need 5 or 6 white felt circles that are about 9 inches in diameter. If you want the foam to go across the back, you’ll need more. We decided against it because we wanted more room for the “drink order” on the back. (More on that later.)  They don’t need to be perfect circles so don’t worry your pretty little head about making it precise.  (The little ones pictured here are for the headband.)

Sue at Home Starbucks Latte Costume white felt

To make the whipped cream, fold your felt in an accordion fold vertically along the dotted lines below. Add small horizontal lines of hot glue (it adheres faster than the felt glue) across the center to glue each section together. Then fold it along the middle and you’ve got a big, fluffy, frothy glob of whipped cream / foam! Use a thin line of hot glue along the center back of the felt to attached it to the dress.

Sue at Home Starbucks Latte Costume foam

To make the frothy headband, grab two of the smaller circles and glue them together with the headband running through the middle of it. This will be your base to build the straw and foam onto. Lots of tutorials suggested a paper towel roll with green paint but I had some extra green felt so I tried gluing it into a tube shape and it worked! Just use paper clips to hold it together while the glue sets. Once your straw is dry, cut 4 slits in the bottom of it and glue the tabs onto the circles on your headband. Again, use paper clips to keep it in place while it dries.

Sue at Home Starbucks Latte costume headband

After the straw was glued in place, I added some more white felt over the green on the base to cover it up. Then I made the whipped cream with the small circles using the same method as I used on the dress.

Sue at Home Starbucks Latte Costume straw how to

Perfect!

Sue at Home Starbucks Latte Costume straw

To really make it look like a Starbucks cup, I wrote the “drink order” on the back with a black Sharpie. The order boxes from top to bottom are: Decaf, Shots, Syrup, Milk, Custom, and Drink. We customized Sophia’s with an X in the decaf box (to make it a decaf – duh), with a WC in the custom box (to add whipped cream) and PSL in the drink box (to make it a pumpkin spice latte). We also wrote her name but since they ALWAYS get it wrong at Starbucks, I wrote Sophie instead of S. Check with your local barista to make sure your costume matches your real order!

Sue at Home Starbucks Latte Costume back

I hope you liked this Starbucks latte costume tutorial.

XO

Sue at Home

P.S. If the thought of a Pumpkin Spice Latte is making you hungry, check out my recipe for Pumpkin Spice Whoopie Pies with Cream Cheese Filling!

P.P.S. Thanks so much for visiting Sue at Home and reading this post. I wrote it back in 2016 and it’s now been viewed 25,000 times! If you enjoyed reading about my creativity and want to see what I’m up to now, check out Libby & Smee, my handmade line of simple fun statement jewelry! And be sure to use coupon code SUEATHOME10 for 10% off your first order at libbyandsmee.com !

Entertaining, Food, Home

How to Make Emoji Rice Krispies Treats

Hi all! I’m back with some more creativity in the kitchen. Emoji Rice Krispies Treats! (Just look at how good they came out. Believe me, I’m more shocked than you are!)

Sue at Home Emoji Rice Krispie Treats main

Before we get started, I need to give major props to Mister Krisp who is the one-and-only inspiration for this project. If you don’t know about her — and yes, this Mister is a her — Jessica Siskin is a NYC-based writer who just happens to make amazing dessert art with Rice Krispies treats. She has a huge following on Instagram and one of her most famous projects is her emojis. (While you’re checking out her Instagram, be sure to note her Rice Krispies tacos,  her Rice Krispies burger and oh yeah, her Rice Krispies Drake. I figured the emojis would be a great project for me and the girls to make to take to a barbeque today. (Shout out to Kelli and Rob!)

Sue at Home Emoji Rice Krispie Treats ingredients

The ingredients you’ll need are: 6 cups of Rice Krispies cereal, 3 tablespoons of butter, a 10 ounce bag of marshmallows, yellow food coloring, Pam cooking spray and frosting in the following colors: black, white, blue, red and pink. I bought tubes of Wilton decorating icing in black and red and then made a quick mini batch of white icing and used food coloring to make the other colors. (Note: I do NOT recommend the Wilton Ready-to-decorate cans. The frosting comes out too fast and it’s very hard to control.) For supplies, you’ll need a round cookie cutter and a Wilton #3 round piping tip. (If you want blush on some of the blushing emojis, you’ll also need red food coloring and a foam brush.)

The Rice Krispies treat directions are right on the cereal box: you melt the butter in a big saucepan on low, then add the marshmallows. As they melted, I added about 5-6 drops of yellow liquid food coloring to get the emoji color.

Sue at Home Emoji Rice Krispie Treats melting

Then you remove it from the heat and stir in the Rice Krispies. We laid wax paper on cookie sheets (just to protect the table) and dumped the mixture in the middle. Then I used a spatula coated in Pam to spread it out and press it down so it was flat. They should be somewhere between 1/4 inch and 1/2 inch high. I kind of like how fat this one in the front came out and it’s about a 1/2 inch.

Sue at Home emoji rice krispie treats close up

After you’ve got the mixture all spread out (you might need more than one cookie sheet), use the cookie cutter to cut circles. (You can spray it with Pam so it doesn’t stick.) You’ll want to use a flat spatula coated in Pam to lift them. Do not underestimate the stickiness of melted marshmallows! Pam is your friend. Pam is sort of like the most important ingredient in this whole recipe. Use her wisely! In fact, Mister Krisp even advises spraying it on your hands to mold Rice Krispies treats. We did just that and reworked the leftovers into a new layer of Rice Krispies treats to cut from.

Sidenote: On the first batch, I completely forgot the food coloring! We decided to still use some of them (I mean, they taste the same!) even though they looked more like rice cakes. Oops. You can see the difference here.

Sue at Home Emoji rice krispie treats 2 colors

All you have to do after you cut them is pipe on the frosting. I know this may sound daunting but if you’ve ever piped “Happy Birthday Whoever” onto a cake, you can do this. It’s just a series of little half circles and lines, plus some hearts, tongues and teardrops. (I kept this image from Mister Krisp up on my laptop as I worked.)  I don’t have any shots of me actually piping it because my assistants were totally over me at this point but here’s my advise: keep the piping tip close to the Rice Krispies treats, move slowly, and squeeze hard. As long as you stay close and go slow, you can’t screw it up.  If I ever make this again, I’ll invest some more tips because the biggest annoyance was taking the tip off and washing it before starting the next color. Here’s a process shot with just black and white icing.

Sue at Home Emoji Rice Krispie Treats black piping

But they really come to life once the other colors are added!

Sue at Home Emoji Rice Krispies 4 vert

Some of them, like the little guy on the bottom left below, call for blush. I couldn’t find a tutorial from Mister Krisp so I just figured it out on my own.

Sue at Home Emoji Rice Krispies 4.2

I used some blood — just kidding! — but seriously, doesn’t it look like blood? It’s actually red gel food coloring. I put a little on a plate and used a foam brush to just dab a little color onto his cheeks. Just be sure to blot it A LOT on the paper plate before putting it on the emoji. I think it worked out pretty well for those little shy guys!

Sue at Home Emoji Rice Krispie Treats blush collage

It was an easy, though somewhat time-consuming, project that looks a lot more impressive than I thought it would!

So, tell me…what’s your favorite emoji? I probably use the smooch lips the most because I “speak emoji” with my kids more than anyone else but I am partial to the wink and the heart eyes too!

Hope you’ll try this fun project!

XO

Sue at Home

Sue at Home Emoji Rice Krispies Treats Pin

Entertaining, Food

The Only Guacamole Recipe You’ll Ever Need

Sue at Home Guacamole with chip

dormify_posters_summer15_allicareaboutisguac

Okay, maybe not just three people but I do admit I have a pretty serious obsession with guacamole. In fact, I’ve made it my life’s work to perfect my guac recipe. And today I’m here to share it with you beautiful people. (By the way, that print above is a poster from a site called Dormify and I might have ordered it if it wasn’t from a site called Dormify.)

Now don’t think you’re going to get some secret ingredient here because my recipe is pretty basic. But with the right ratios of those basic ingredients, I think you’ll agree that this guacamole is pretty special.

I know I sound like I’m tooting my guacamole horn but I get requests to make guac for just about every party I go to but I recently had such a nice compliment that I figured this post was far past due. It all started when I made it for Sophia’s end-of-the-season soccer party and a bunch of people at the party asked for the recipe. Then a few weeks into the summer, I got this text from one of my fellow soccer moms: “Huge shout out to you for the guacamole recipe. I have made it 4 times for different events/people and everyone LOVES it. Thank you!!!” (So you can all thank Donna for her compliment because it made me finally get around to writing this post.)

Sue at Home guacamole ingredients

I meant to share this recipe with the Sue at Home readers years ago but…I ate it. No — seriously. Back in 2012, I photographed every step of the chopping process but then once it was in the bowl, it disappeared so quickly that I never got a shot of the actual finished product. Oops. Luckily, I got some shots this time before I inhaled it so let’s get down to business, shall we?

First off, you’ll need 5-6 ripe avocados. Don’t even attempt this recipe if your avocados aren’t ripe because you’ll waste your time and end up with crappy guacamole. (And it won’t be my fault.) I get mine at Whole Foods because I like to bleed money  they always have ripe ones. The rock-hard avocados that most stores sell won’t be ripe for about 6 days…and who wants to wait that long for guacamole?

Sue at Home Guacamole avocado and knife

You’ll need 1 or 2 vine-ripe tomatoes. I usually take most of the guts out but I leave a little to keep it juicy. Chop ’em up but don’t worry about getting them too small.

Sue at Home guacamole tomato

Most guacamole recipes call for red onions but since they’re disgusting and they repeat on me, I use spanish or vidala onions. Just a half an onion chopped up should do it. Now is a good time to mention that I use one bowl for the good stuff and one bowl for the junk because it makes me feel like I have my own cooking show. Oh — and my bowls are from Anthropologie (similar here) but you probably already knew that because I used them in the rainbow cake post.

Sue at Home Guacamole onion

Next up is the divisive cilantro. I know some people don’t like it. (In fact some people are even genetically predisposed to think that it tastes like soap. If you think I’m kidding, you’ve got to read this article in the New York Times. Apparently, even Julia Child hated the stuff.) But the recipe isn’t quite the same without it so just hope that you don’t have any of those cilantro haters in your audience. Grab a big handful off the bunch and chop it up. Technically, you’re supposed to pull the leaves off the stems but I never do and I’ve never had a complaint.

Sue at Home Guacamole cilantro

To give your guacamole a little kick without lighting your guest’s mouths on fire, a few jalapeno peppers should do the trick. This is one part of the recipe that has evolved over the years. I used to use one jalapeno, then two. Now I’m up to three or four. As long as you take the seeds out, the jalapenos will just add some nice flavor without too much heat. Just be sure to really mince them so your guac doesn’t have huge chunks of jalapeno. A couple tips: Cut the top off and then make a few little slices down the side with your paring knife. (See below) Then you can slide the knife in and separate the guts from the outside without getting seeds all over the place. And also — scrub your hands like crazy after handling jalapenos because if you don’t and you’re a contact lens wearer like me, your fingertips will burn your eyeballs like the depths of hell. (You’ve been warned.)

jalapeno

Sue at Home Guacamole jalapeno

I like my guacamole nice and citrusy so I use the juice of a whole lime. Can’t you practically hear Tom Colicchio saying that my guacamole has “good acid”?

Sue at Home Guacamole lime

Two more things — which just might be the most important ingredients of all — salt and pepper. I’ve never measured the amount I put in but I can tell you that I’m very generous with the salt. Go ahead and mix everything up and then add salt and pepper to taste. I just keep adding salt until I think it’s perfect. (And to those eagle-eyed readers out there — yes, that’s the pepper shaker from the set of shakers we gave out as wedding favors 14 years ago! More on those here.)

Sue at Home Guacamole pepper

Some people slice up the avocados before they scoop them out but I find that they mush up nicely without doing that. Just scoop them out with a spoon!

Sue at Home Guacamole avocado scoop

Of course, this is just a personal preference but I like to serve my guac with Tostitos Bite Size chips. If you use a bigger chip then you end up eating more chip and less guacamole and really…isn’t the guacamole the star, here?

Sue at Home Guacamole bowl with chips

You’ll definitely want to make this fresh right before you serve it or your guacamole will turn brown. But if you need to, go ahead and combine all of the ingredients (except for the avocados!) a day in advance and keep them in a closed container in the fridge so all the flavors can party and get to know each other.

Sue At Home’s Only Guacamole Recipe You’ll Ever Need

5-6 ripe avocados 

1/2 spanish onion, chopped

1-2 vine-ripe tomatoes, chopped 

1/2 bunch of cilantro, chopped 

3-4 jalapeno peppers, minced

Juice from a whole lime

Salt and Pepper to taste 

**Serve with Tostitos Bite Size chips

Chop all of the ingredients and stir until mashed and combined. It makes a nice, big, party-size portion but it’ll go fast. (One time my friends ate the whole bowl while I was busy making mojitos. True story.)

Happy Guacamole Making!

XO

Sue at Home

guac collage


Uncategorized

Bathroom Remodel Reveal

How do I love my new bathroom? Let me count the ways: 

 1. IT’S DONE! We’ve known for years that we would need to remodel the bathroom because the pipes were clogged and we couldn’t use the sink. (Yes, we had multiple plumbers attempt to fix it but they all determined that the wall would need to be removed to access the pipe.) So, after several years of brushing our teeth in the main bath, we can finally use our sink again and for that alone, I say Hallelujah! 


2. WALL-TO-WALL COUNTERSPACE. Our old vanity was tiny (offering only an inch or two on the sides) so it made any basic task, like putting on makeup, extremely difficult. Even with all the pretty things in the new bathroom, the counterspace is probably my favorite feature! To have a daily task simplified like this feels like a great luxury to me. Oh – and did I mention that we lucked out by finding a pre-fab marble countertop at Home Depot that fit perfectly? It came with the sink and was a fraction of the cost of a custom marble top!     

3. ART. I always knew I wanted some green in the bathroom and even considered banana leaf wallpaper but when I saw these prints from The Aestate (they’re the Beverly I & Beverly II trimmed to fit the frame), I knew they were perfect. (Bonus: they’re cheaper and less of a commitment – perfect for my fickle taste!) Note: The frames are from Crate and Barrel and the wall color is Benjamin Moore Cloud White. 


4. AN INDUSTRIAL LIGHT. I fell in love with this gooseneck from Restoration Hardware and didn’t look much further. (Truth be told, if I could go back and change one thing, I’d go with thin sconces on the sides of the mirror instead of the overhead light. It’s cool but you can’t really see the gooseneck detail because it’s up so high.) 

  
 5. CERAMIC TILE.  I’m obsessed! Isn’t it beautiful? I’ve got to give credit to Pablo on this one. (It’s the Circulos Black from Cement Tile Shop.) We were considering some classic small hex tile and he spotted this on my Pinterest board when I was showing him something else. Note: Our contractor had a lot of trouble with it. The dark grout stained the tiles and he had to buff them to get back to the correct color. So, please – if you ever use this kind of tile, be warned! 

  
6. PRETTY TOWEL HOOKS. They’re from Anthro. Cute, huh? 


7. A CUSTOM VANITY. Our contractor also happens to be a master woodworker and he made this beauty to our specifications and just like that, all my vanity dreams come true. (What? Am I the only one who dreams of bathroom furniture?) I love how it looks like a piece of furniture because it has feet and doesn’t quite reach the walls. And it gives us a lot more storage inside than our old one did! (The brass and green hardware is from Anthropologie but they’re sold out now. Sorry.)  
8. A MODERN TOWEL RING AND HAND TOWELS.   I labored over the hardware but decided that since we just needed a small hand towel, I didn’t want to use a rod. But finding a ring that doesn’t scream “welcome to 1983!” proved difficult. Enter this cheapie from Urban Outfitters (so cheap it didn’t even come with hardware)! I love it and it works perfectly with these thin Turkish towels from West Elm. (Pablo says he’s afraid to use them because they look too fancy!)  I think he finally relaxed when I showed him that I bought a bunch of them – from grey to white. Here’s what it looks like with the white one:  

 9. WAINSCOTING.  I originally wanted white subway tile in here but I’m so glad we decided to switch to wainscoting. It looks classic but the dark paint (Benjamin Moore Black Jack) makes it modern. Get this: our contractor MADE every piece of trim.  He’s amazing!    

10. A PRETTY T.P. HOLDER.  I understand that I shouldn’t be this excited about hardware but isn’t it so nice? I love how the antique brass looks against the black wall. (It’s from Pottery Barn if you must know.)   

11. ACCESSORIES. I’m not into lots of “stuff” on countertops so we only have a few accessories. I can’t find a soap dispenser I like so until I do, this J.R. Watkins Aloe and Green Tea hand soap while suffice. The malachite bowl from Hillary Thomas was a Christmas present from Pablo last year. I have a malachite obsession but I know there’s a little malachite fatigue in the market right now so I’m actually glad we only made a small investment in it. (This beauty is just the right size to hold rings while I’m washing my hands.)    

 We keep our toothbrushes in a green glass from Anthropologie. And of course we have a Baies candle cause, duh, it’s the best candle on earth.   

12. A MASSIVE MEDICINE CABINET. We fell in love with the Rivet mirror/medicine cabinet from Restoration Hardware and having it inset makes the bathroom feel so much bigger than before. Plus it’s pretty and offers TONS of storage inside (so much that I even let Pablo have some)!  

 Do you hear the angels singing? Because I do every time I open it!
 
I hope you enjoyed this update as much as I love our new bathroom! Sorry for the no-bells-and-whistles blog post (i.e.: no links but plenty of crappy iPhone pictures). I haven’t written in so long and I just don’t have the time to do it the “right” way! Right now, it seems that life is more important than blogging for me. Sorry I’ve been MIA for so long but if you’re interested in what projects I’m up to, follow me on Instagram @sue_erneta. (Maybe I’ll eventually get around to writing a post about Sophia’s amazing Starbucks latte Halloween costume!)

XO

Sue at Home

Food

Recipe: S’mores Bars

I’m here with a quick post to tell you about an amazing dessert I made yesterday. I didn’t photograph all the steps but I heard so many “I need the recipe!” comments at the BBQ that I brought them to, I figured I’d write a quick post to tell you where to go to find it.

s'mores pin collage

smores pic

I had never made a cookie bar before but when I saw this recipe for S’mores Bars on Life in Grace, I just had to make it. 

It starts with a cookie dough-like mix of graham cracker crumbs, flour, baking powder, salt, eggs, vanilla, brown sugar, white sugar, and of course, butter. You start by spreading half of the dough into the bottom of a greased pan. (Follow Edie’s tip about spreading it with a knife dipped in warm water. I used the backside of a metal spatula – like this one – and the water trick made it really easy.) After the dough, you layer Hershey chocolate bars and then marshmallow fluff. 

 photo

After the fluff, you just add the rest of the dough on top, add a handful of mini marshmallows, and bake. They were such a huge hit that I almost missed having one at the party! I was knee-deep in an intense game of cornhole and just couldn’t break away. You understand, right? Luckily I had Pablo snag one for me before they were gone.

It was a little time consuming but very easy. If I can make it, you can too!

image

image (2)

So head on over to Edie’s awesome blog Life In Grace and read her whole play-by-play of how to make them. While you’re there, check out her stunning home that’s full of personal style. Her sexy, moody master bedroom and colorful, busy workroom are two of my favorites.  

Happy baking!

XO

Sue at Home

P.S. If you can’t get enough of yummy graham cracker, chocolate, and marshallow treats, try my S’mores Parfaits too! 

smores parfait Collage

Before and After, Decor, Home, My house

House Update: New Batik Pillows and West Elm Lamp

Ah, how I love a batik pillow! Remember back when I told you about those Amber Interiors ones that I was dying over? And remember how they were crazy expensive?

sally pillow

Well, my Etsy substitutes from OrientalTribe11 arrived and They. Are. Perfect!

pillows 131

134 pillow

They took a little while to get here–I mean, they were coming from Thailand after all–but they are as beautiful as I imagined. I was a little afraid how the navy and white batik would work with my teal walls but I think it’s divine. And obviously, I love the neon pink and orange accents. (Apologies for the couch that looks like a saggy elephant’s ass. I promise that what it lacks in appearance, it makes up for in comfort.)

pillows 133

They’re made really well. I’ve had them for awhile now and I’m so happy with how they look. Check out the detail:

pillows 137

The room looks so much better with some more streamlined pillows. Remember the hot mess of pillows I had before?

pillows collage textSidebar: And see the change in that doorway to the right? I painted the hideous wood paneling in the playroom (including that stairwell that leads to it) so I’ll be telling you all about that change soon. (And yes, that means that I totally broke my resolution!)

And looky here, another change!

pillows 138

Did you spot it in the foyer behind the couch?

pillows 154

We got a new lamp from West Elm and I am loving it!

pillows 144

It’s the Geodesic Table Lamp and I love the openess of the brassy base. Plus that tan lampshade is so warm and sophisticated. I feel like it’s the look I was hoping for when I got the Nate Berkus for Target one, but this one…well, you get what you pay for. (No knock to Nate of course, his is still damn good for a $50 lamp!)

pillows 140

It’s coming together one little bit at a time.

XO

Sue at Home

P.S. I feel like whenever I show the living room, the paint color never reads right on camera. So, here’s a swatch of the real color: Benjamin Moore Teal.

benjaminmooreteal

Before and After, Decor, Family, Home, My house

Hallway Gallery and Runner

hallway 006When you last met my hallway…what? You’ve never met my hallway? Oh the shame. Let’s get better aquainted.

Back in 2010 when we moved in, our hallway had brown wall-to-wall carpet (yikes) and poorly textured creamy walls.

HALLWAY DSC_1232

hALLWAY DSC_1239

It only took about a month before we ripped out the carpet and had the wood floors underneath refinished. We went with a dark stain downstairs but we kept the hall pale to go with the floors in the bedrooms. Check out 2 year old Lily showing off the pretty hardwood back before I fixed the stair risers. (Doesn’t she kind of look like a ghost? Boo!)

5396523371_b55b76b896_z

A few months after that, Pablo attempted to skim coat the walls (I’ll give him an A for effort) and we painted the walls in Benjamin Moore Coventry Gray with Cloud White trim.

5667967610_9b23f3135d_z

That was three years ago and everyday since then I’ve had the intention of hanging some extended family pics up there. And now it’s done! Well, not done. More like a decent start. (You’ll also notice I’ve sort of learned how to use my camera too.)

hallway 023

I shopped for the runner for a loooooong time. That problem with my expensive taste and limited budget got in the way but eventually I fell for a pretty kelly green wool flat weave rug in a Jaipur catalog my mom had borrowed from a local decorator. I was contemplating getting one (and even paying the expensive-for-me $200+ price) when this beauty popped up on One Kings Lane for only $149. I had to go for it. Lucky for you OKL has it right now, too (for a few bucks more).

OKL rug

The next step was the frames and since you know me, you can imagine I tried to go inexpensive with some of the offerings at Target, Kohls and Ikea. But they all just looked too cheap to me so I ended up getting most of them at Pottery Barn. (I can’t say enough nice things about their gallery frames. Just go buy them and thank me later.)

hallway 006

As for the pictures themselves, the focus is on extended family: the girls’ cousins, aunts, uncles and grandparents. (I felt I had thoroughly covered the 4 of the us in our dining room photo wall so it was time to spread the love.) You’ll notice most of them are super casual.

hallway 047

hallway 050One of the favorites is this picture from Thanksgiving a few years ago. It’s the last time we had my family and Pablo’s family together so it’s got a lot of VIPs in it.

hallway 044

The walls look a little sparse for now but the goal is to fill it up top to bottom. Something more like this.

hallway 041

It’s coming together but don’t look up! If you do you’ll see cracked and peeling paint and one of the noisiest flourescent lights in history.

hallway 032

Take a closer look at that texture.

hallway 033

We’re bringing some pros in soon to fix it up and I’ve got plans to replace the light, too. I’ll keep you posted.

And the view from the bedrooms needs a little love too. See that space above the stairs? hallway 056

 I’d love to put something inspirational there so we see if right before we head out for the day. Ya know, something like this:

seize the day

OR

don't forget to be awesome

Maybe we could even jump and smack it like the Notre Dame football team does with their motivational sign…?

play like a champion today

So it’s still a work in progress but I’m happy with the changes we’ve made. It sure is nice to see Mimi, Papa, Uncle Steve, Auntie, Jonathan, Bobe, Grandpa Steve, Uncle Francis, Aunt Nicole, Baylee, Arianna, Carter, Aunt Paola, Aunt Alex, Eliseo, and Weli everday.

hallway 023

XO

Sue at Home

Food

Best Chocolate Chip Cookies on Earth

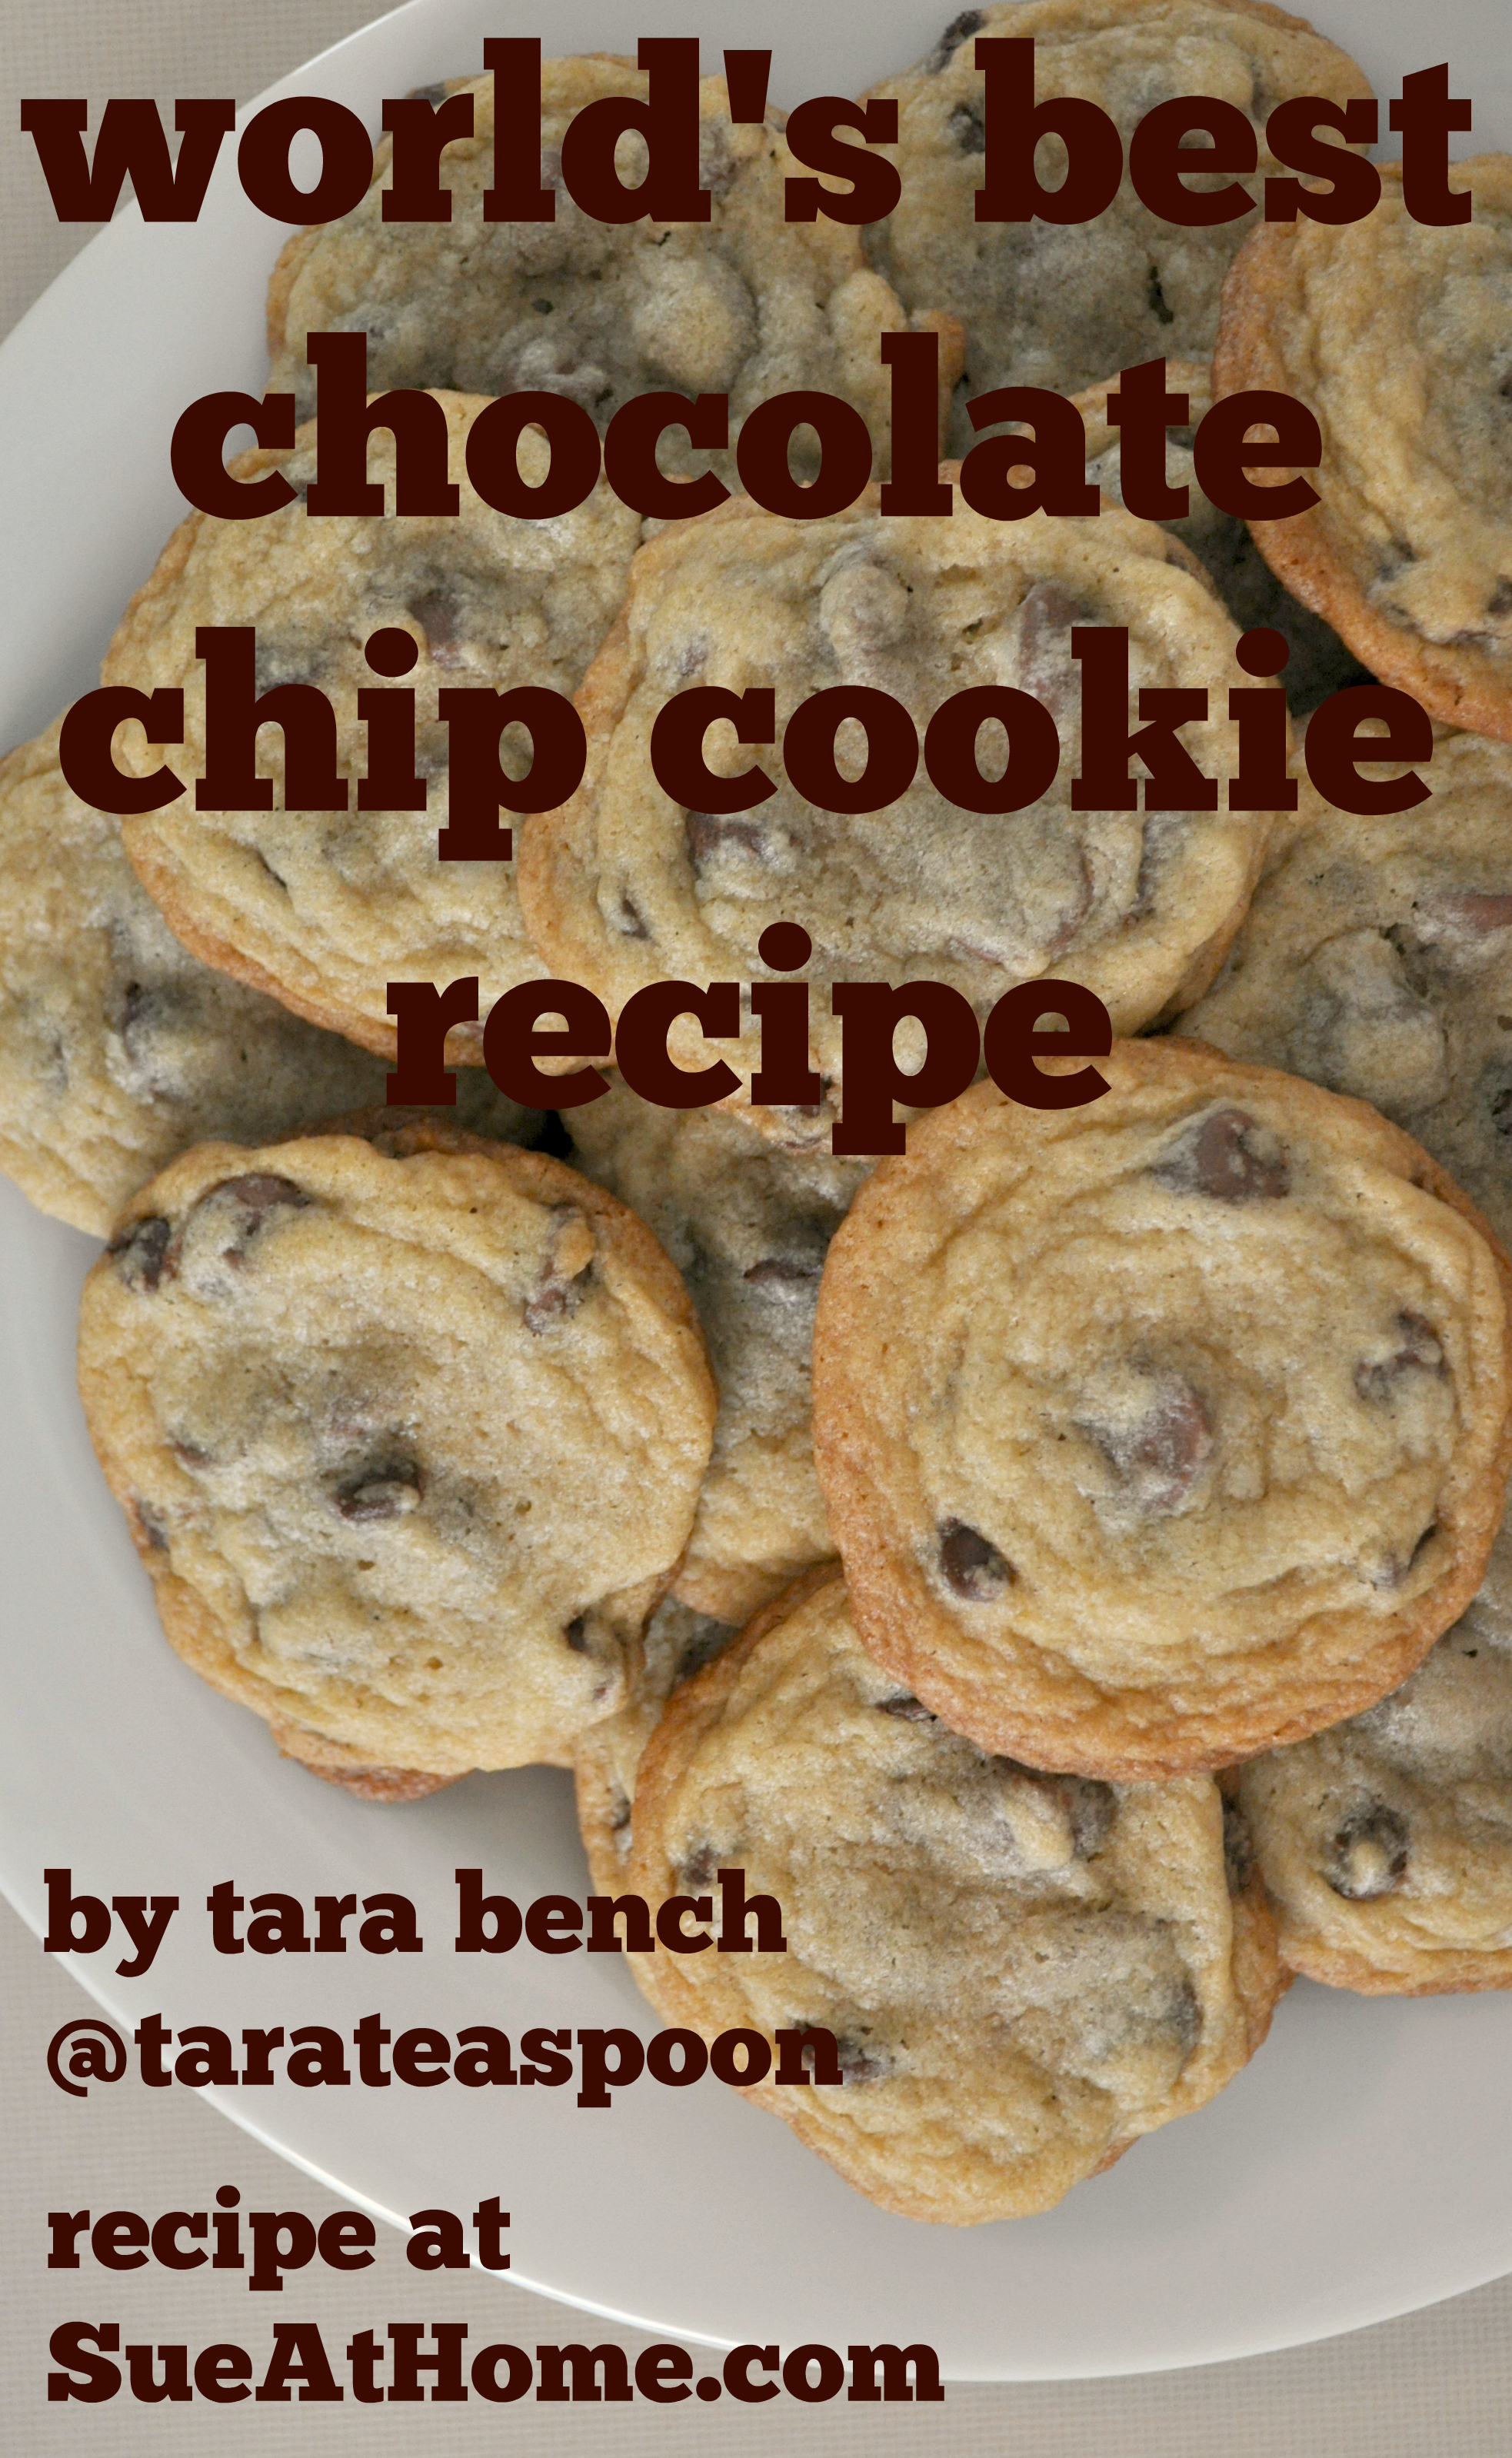
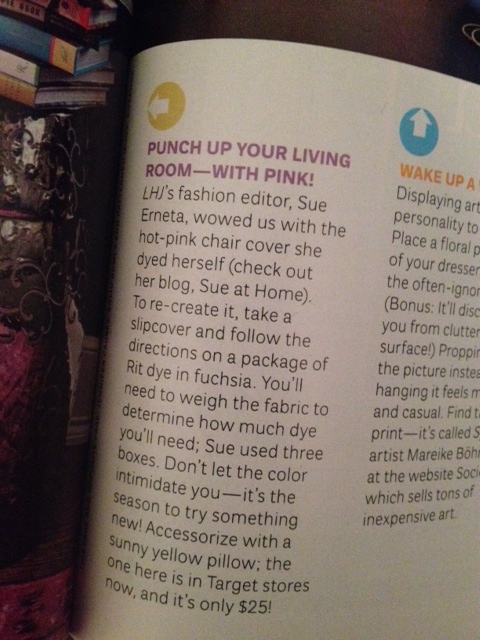
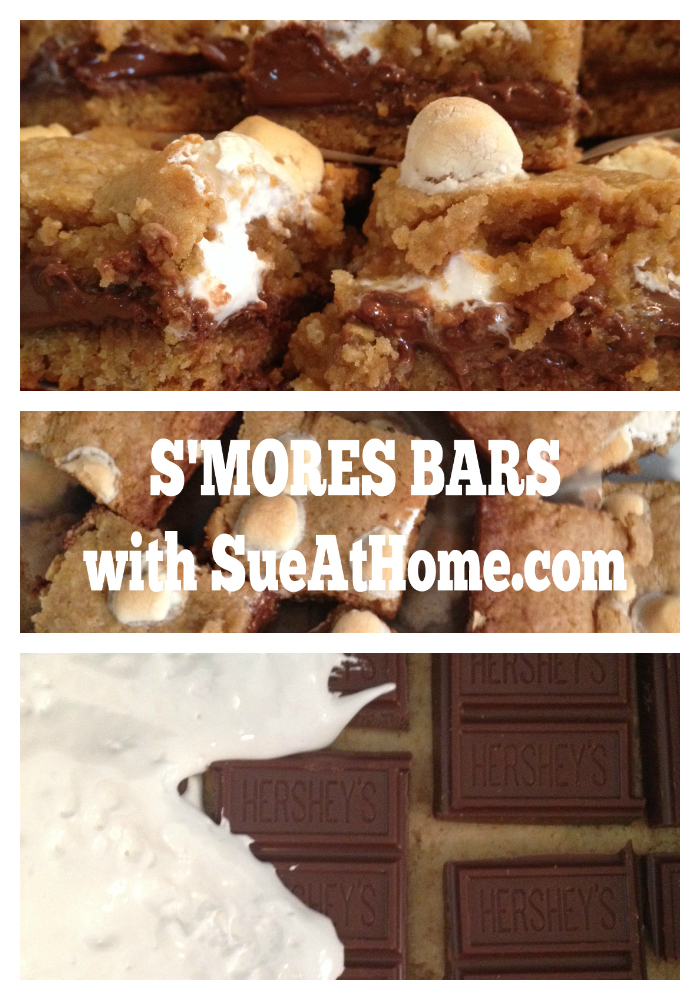
I know that title is quite a claim but people, I’m about to give you a cookie recipe to end all cookie recipes.

taras cookies 047

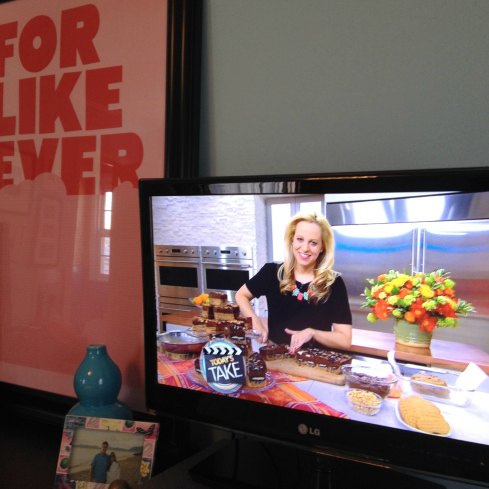
But first let me introduce you to the creator of the Best Chocolate Chip Cookies on Earth, my favorite chef Tara Bench (instagram: @tarateaspoon). Here she is getting ready to serve some delicious treats to Al Roker on the Today Show.

tara on today

She may not be as famous as Ina Garten or Bobby Flay but she’s a celeb chef all right: Tara is the Food and Entertaining Director for Ladies’ Home Journal* and in the 7+ years I’ve worked with her, she’s never made a single thing that I didn’t like. Think about that for a second. Every recipe she produced–whether sweet or savory, difficult or a breeze–has been deeeeelish. And I think I’ve tasted them all! I’m also lucky to call her a friend. (She’s the awesome kind of buddy who answers all of my frantic weekend baking texts when I’m questioning my kitchen skills. Everyone needs a friend like that but no, I’m not giving you her number.)

Tara started her career at Martha Stewart and you can see it in her work; aesthetics are as important as taste. Some of her favorite LHJ recipes are Crispy Ice Cream Bars,  Frozen Blueberry Cheesecake, and Thai Chicken Patties.

But her heart belongs to chocolate chip cookies. They’re her favorite thing to make. And why not when she has perfected the recipe!?

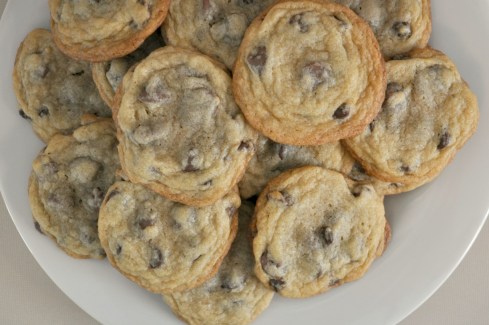
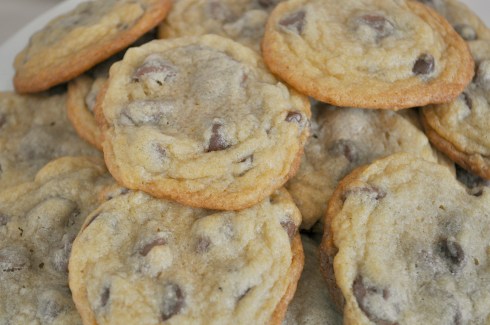
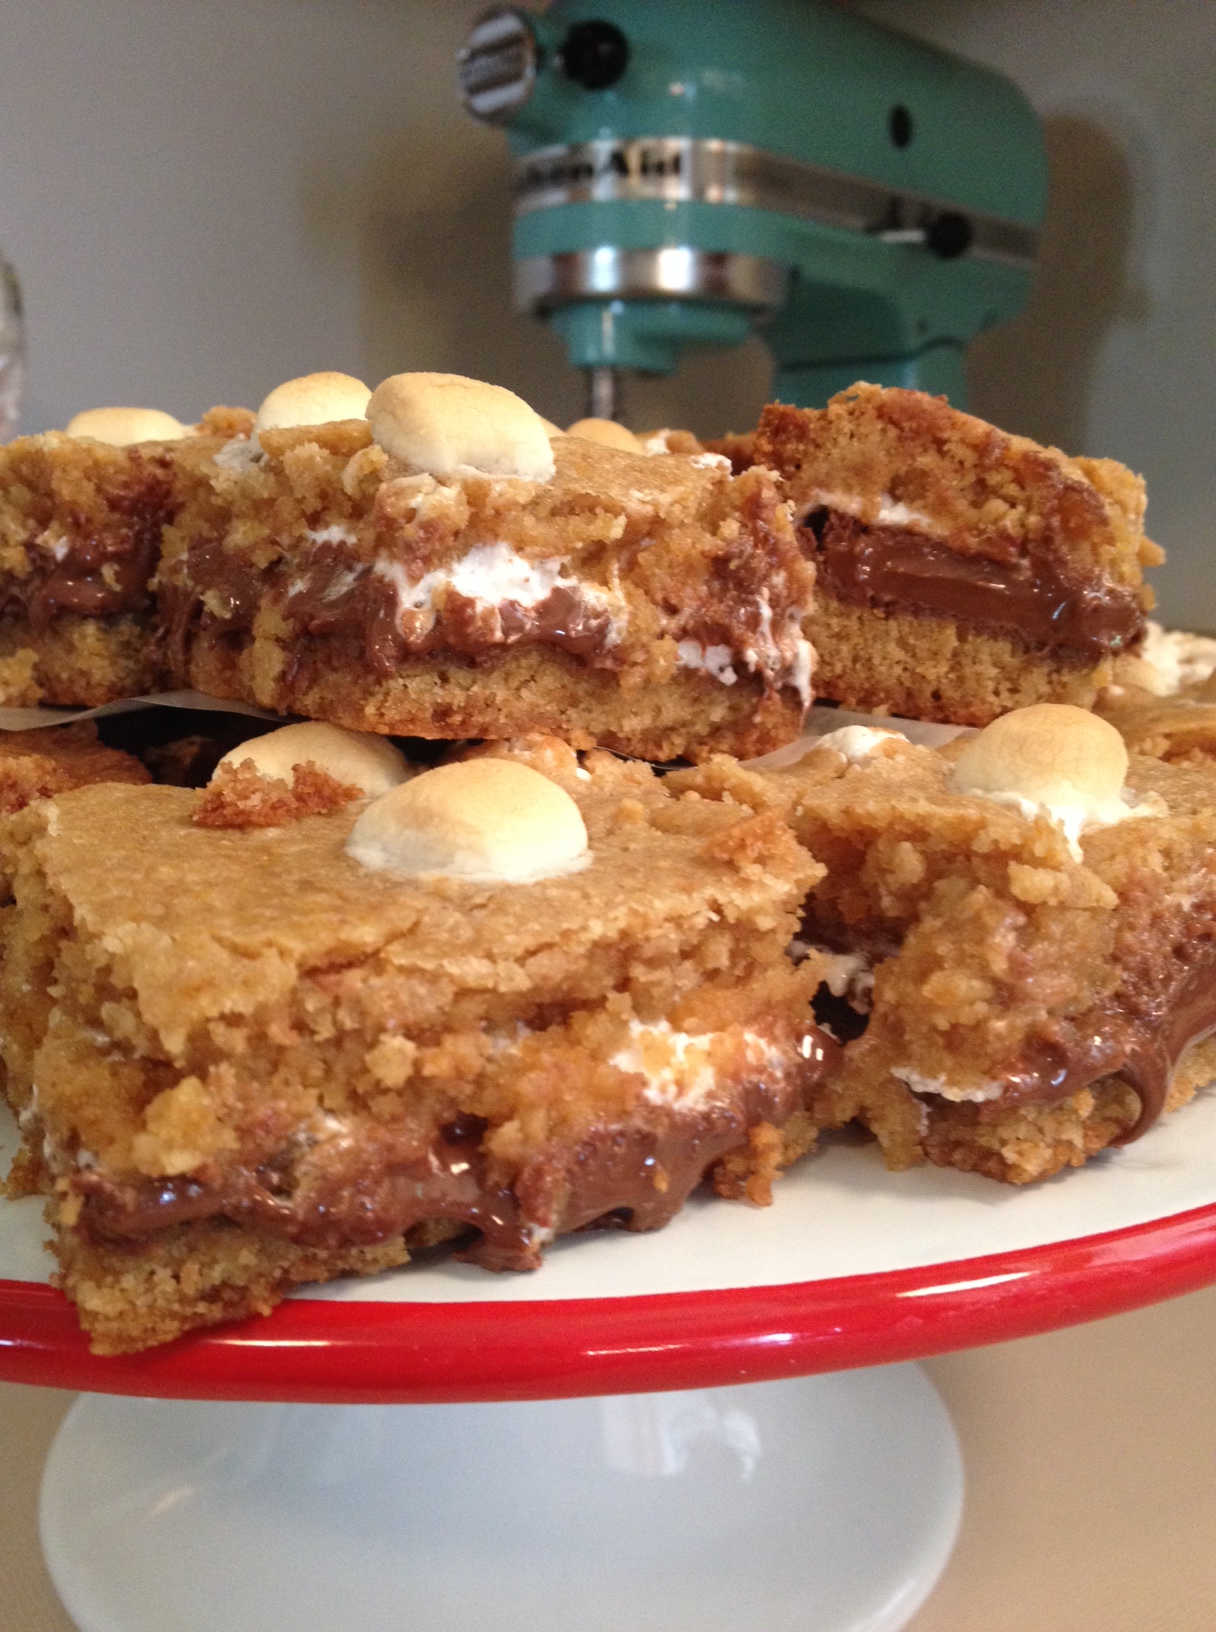
I’ve been on a quest to make the perfect chocolate cookie for a long time but they’ve never been quite right. They’re either too crunchy or spread too thin or not chocolatey enough. So, I finally decided to try Tara’s personal recipe and It. Is. Perfect. They’re sweet and chocolatey but not too much of either. They’re lightly golden around the edges, just enough to give them a little bit of crunchiness.  But the gooeyness–oh the gooeyness!–is the key to this recipe’s success. That soft texture remains days after they’re baked. ( But wait! There’s more! Tara even makes a gluten free version that pretty amazing, too!)

And here’s the best part: even though this recipe is so close to her heart, she gives it to friends and family all the time and she even kindly agreed to let me share it with you. Right here. Right now. (Told you she’s awesome!)

TARA’S CHOCOLATE CHIP COOKIES

4 cups flour (fluff the flour before scooping) or substitute Gluten Free All Purpose Flour for Gluten Free version (see Gluten Free note below)

1 tsp baking soda

1 tsp salt

3 sticks unsalted butter, softened

1 1/2 cups light brown sugar

1 cup granulated sugar

2 eggs

2 tsps or 1 tblsp vanilla extract (I go for the full tablespoon when I make them.)

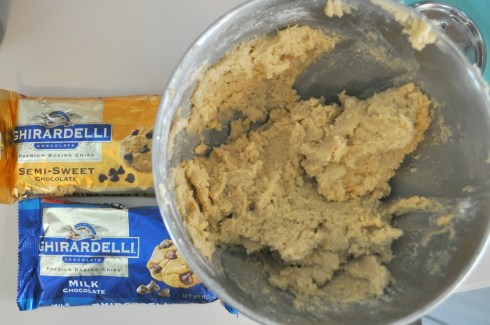
1 package (11.5 oz bag) of milk chocolate chips (I use Ghiradelli and you should to.)

1 package (11.5 oz bag) of semi-sweet chocolate chips (I use Ghiradelli and reduce this amount to a little more than half of the bag.)

Preheat oven to 350. Combine flour, baking soda, and salt in a bowl and set aside. In a separate mixing bowl, cream together the butter and sugars. Add eggs and vanilla.  Mix. Add the dry mixture, a little at a time, and mix. Stir in chocolate chips. Bake at 350 for 10 minutes. (Eleven minutes works perfectly for my oven but be careful. Tara says “Don’t overcook”!)

Gluten Free note: If you prefer rice flour to Gluten Free all purpose flour, you can use that instead (Tara recommends this one) but be sure to add a scant tbsp xantham gum to hold the cookies together. (A “scant” tbsp means slightly less than full.)

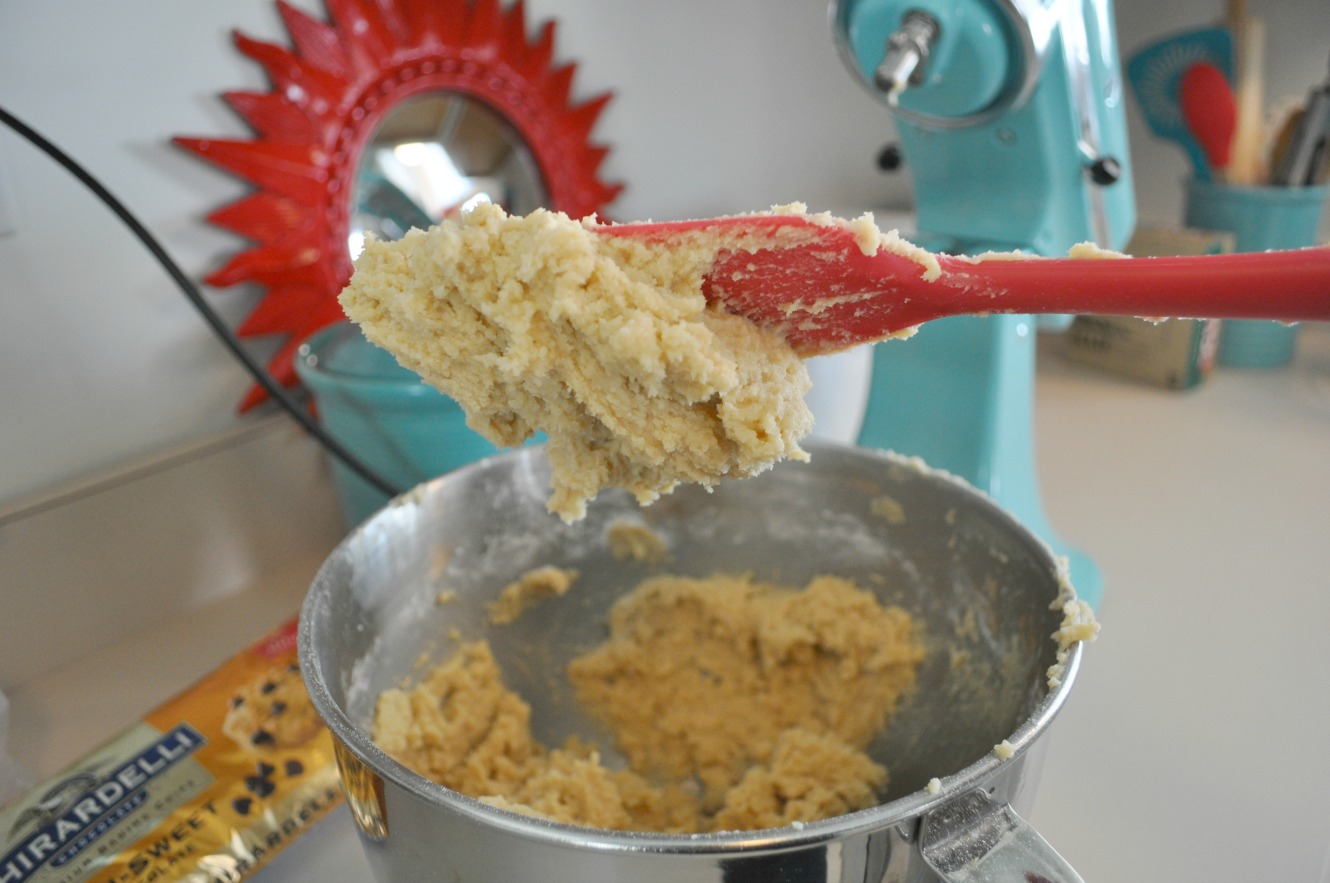
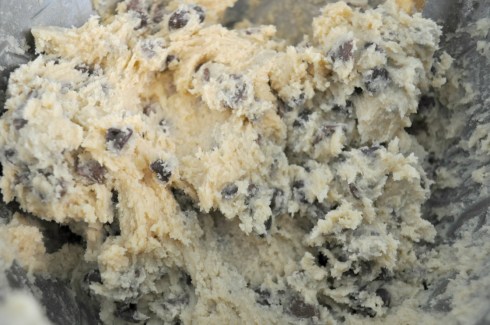
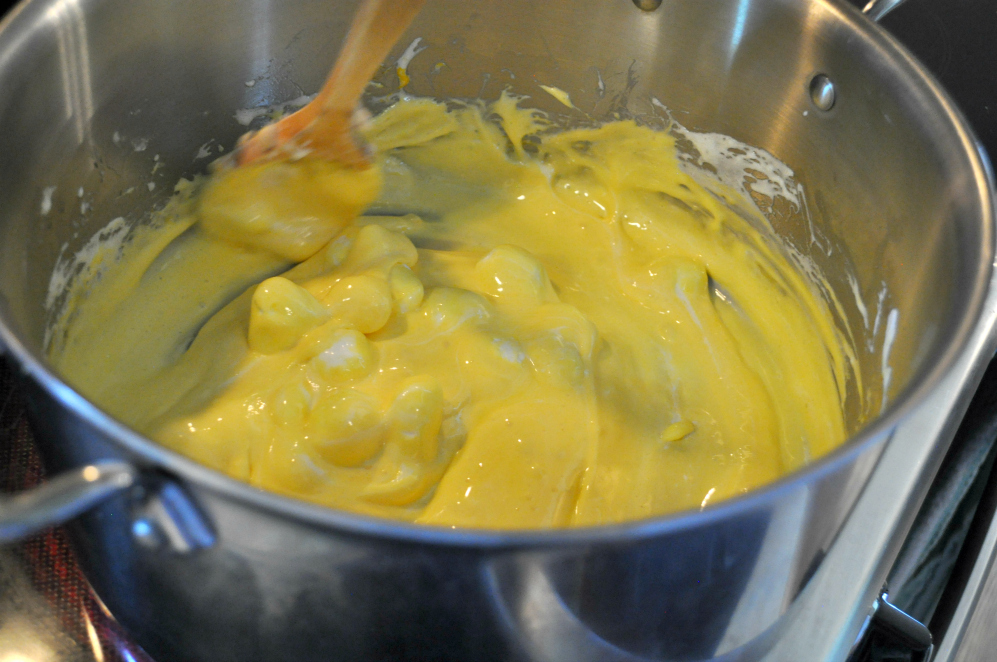
A couple things to remember, the dough is thick! Crazy thick! It’ll look like this when you’re done mixing but don’t worry. That’s how it’s supposed to look.

taras cookies 016

Then get ready to work your stiring muscles! No pain, no gain. Right?

taras cookies 025

Looking good.

taras cookies 027

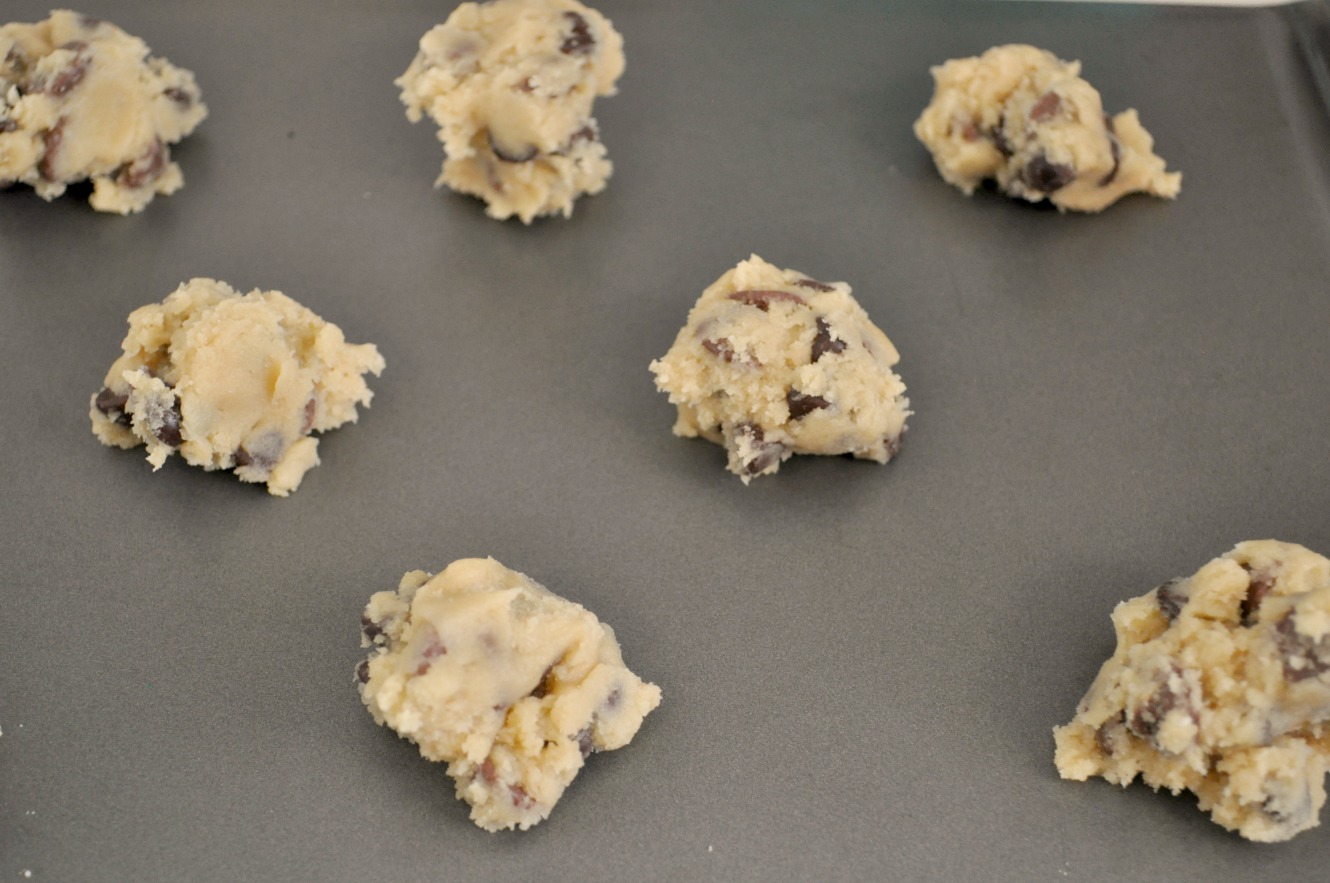
Make sure your little cookie dough balls are spread out enough or else you’ll have a solid sheet of cookies. (I say that like it would be a bad thing. Ha!)

taras cookies 041

When they come out, they look puffy and undercooked.

taras cookies 030

But then they deflate a little bit while they’re cooling.

taras cookies 032

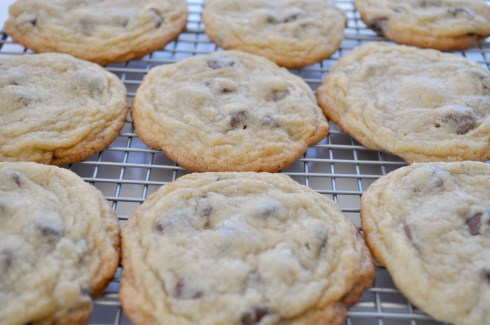
And you end up with perfect cookie goodness.

taras cookies 045

Before you get to baking, I want to urge to follow Tara on Instagram @tarateaspoon. That’s where you’ll get to see her working on her culinary delights…

pop tarst

…hanging out with hottie chefs, like Curtis Stone…

curtis stone

…having cookie throwdowns with her friends (I’ll give you one guess which recipe won!)…

cookie throwdown

…and rubbing elbows (or tummies!)  with all kinds of food industry celebs.

pilsbury

And take note of her oft-used hashtag #wwllt which stands for What Work Looks Like Today. I had no idea what it meant but lots of food industry pros seem to like it so it’s a great hashtag to check out for foodie inspiration.

And don’t forget: Your gluten free friends don’t need to be left out! Just replace the flour with Gluten Free all purpose flour for a perfectly delicious cookie treat.

Happy Baking!

XO

Sue at Home

*With deep sadness I need to tell you that while I was writing this post, Ladies’ Home Journal closed its doors and with that, Tara and I (plus another 33 of my friends and coworkers)  lost our jobs.  I’m trying to stay hopeful that this will be a turning point in my career and that I will move on to bigger and better things. (In fact, maybe you’ll even get more Sue at Home!) But I fear that I will never have a job that I love as much as I loved being the Fashion Editor for LHJ. The kindness of the people that I worked with, the collaborative atmosphere, the quality of the work we produced, and the respect that I felt from everyone around me is a rare thing in business and I feel so lucky to have had that. But I’m hopeful for the future and excited to see what it brings.

I’ll keep you posted on the chapter. And please send positive thoughts my way!
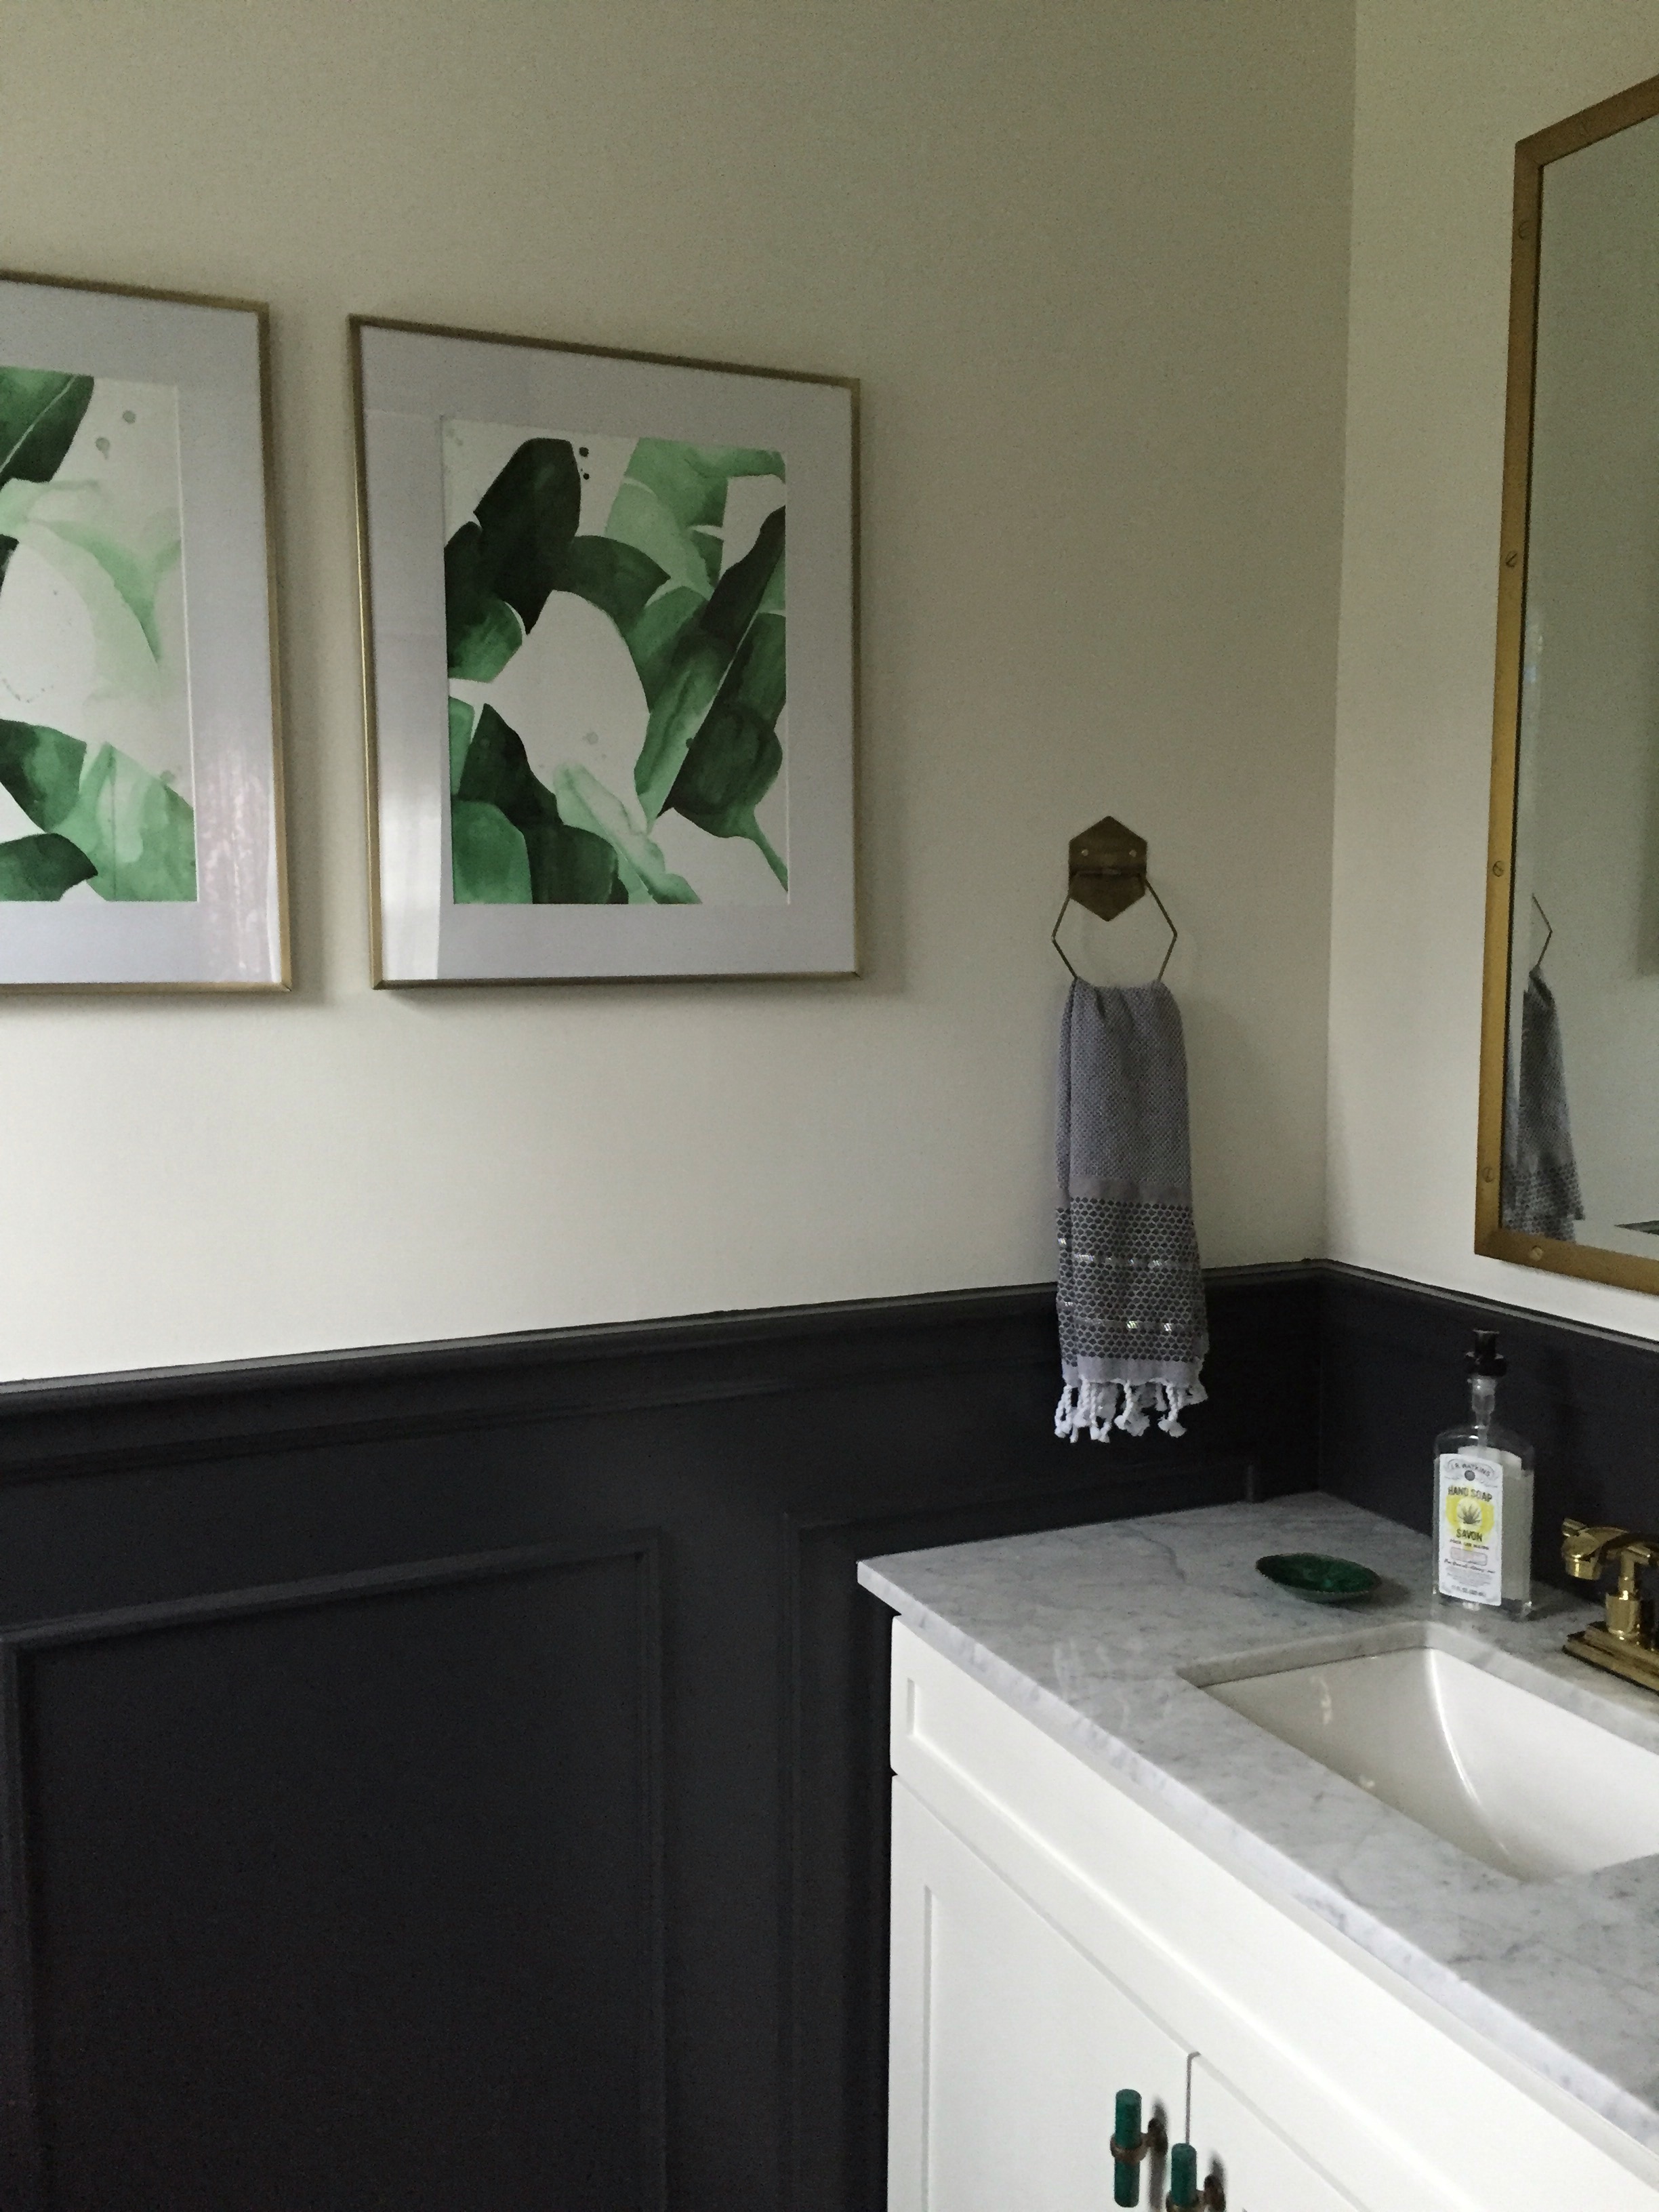
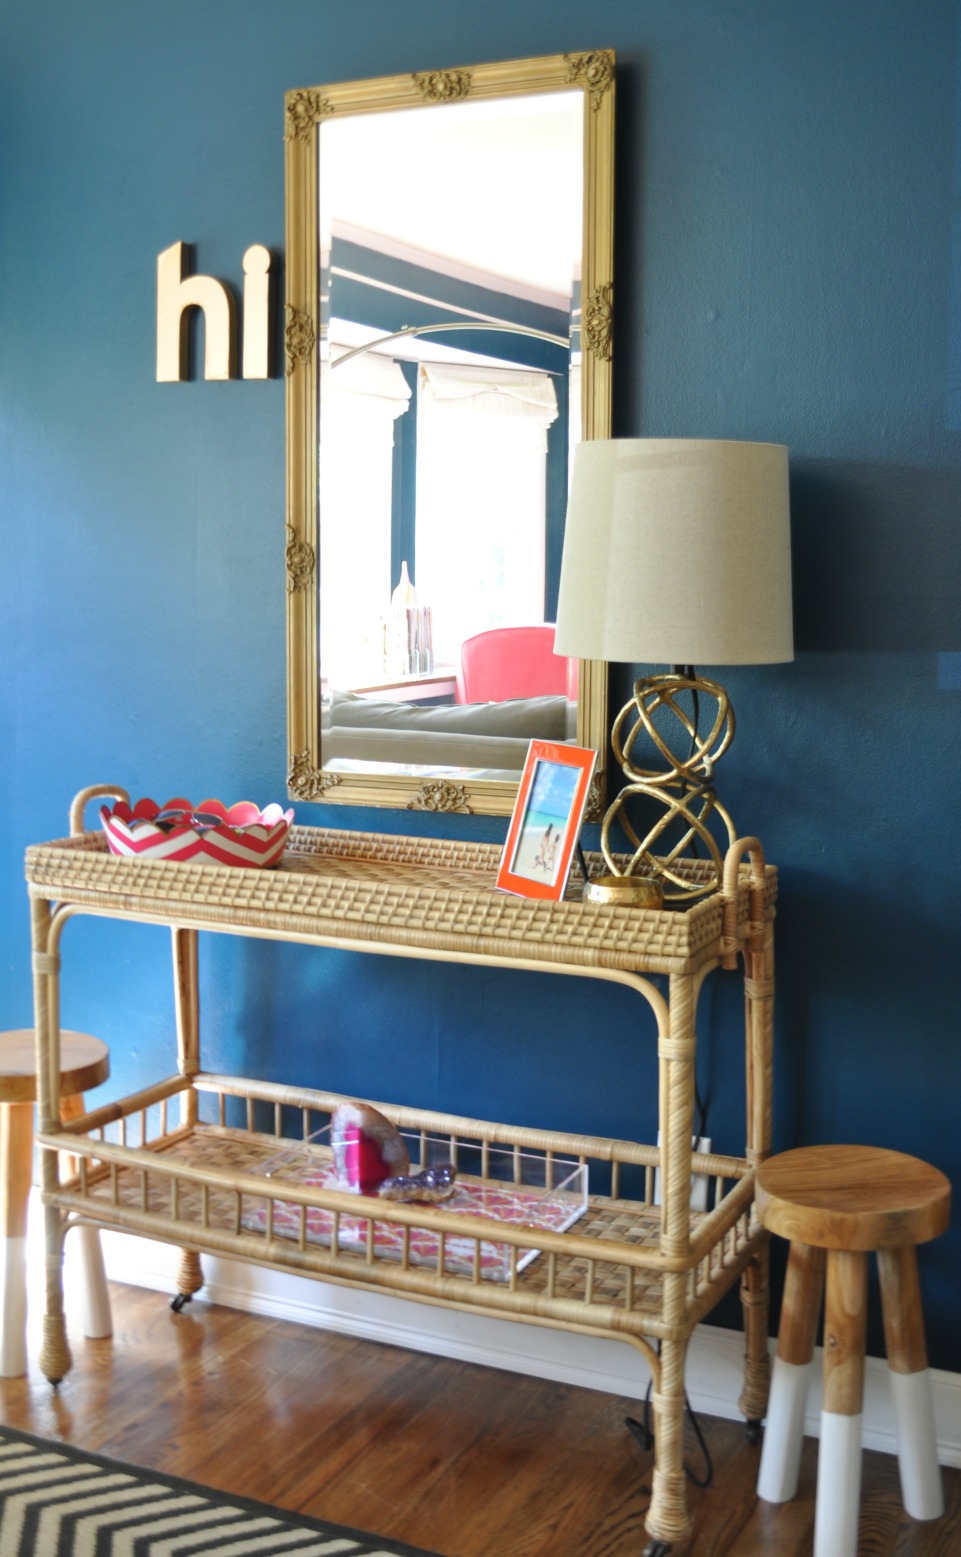
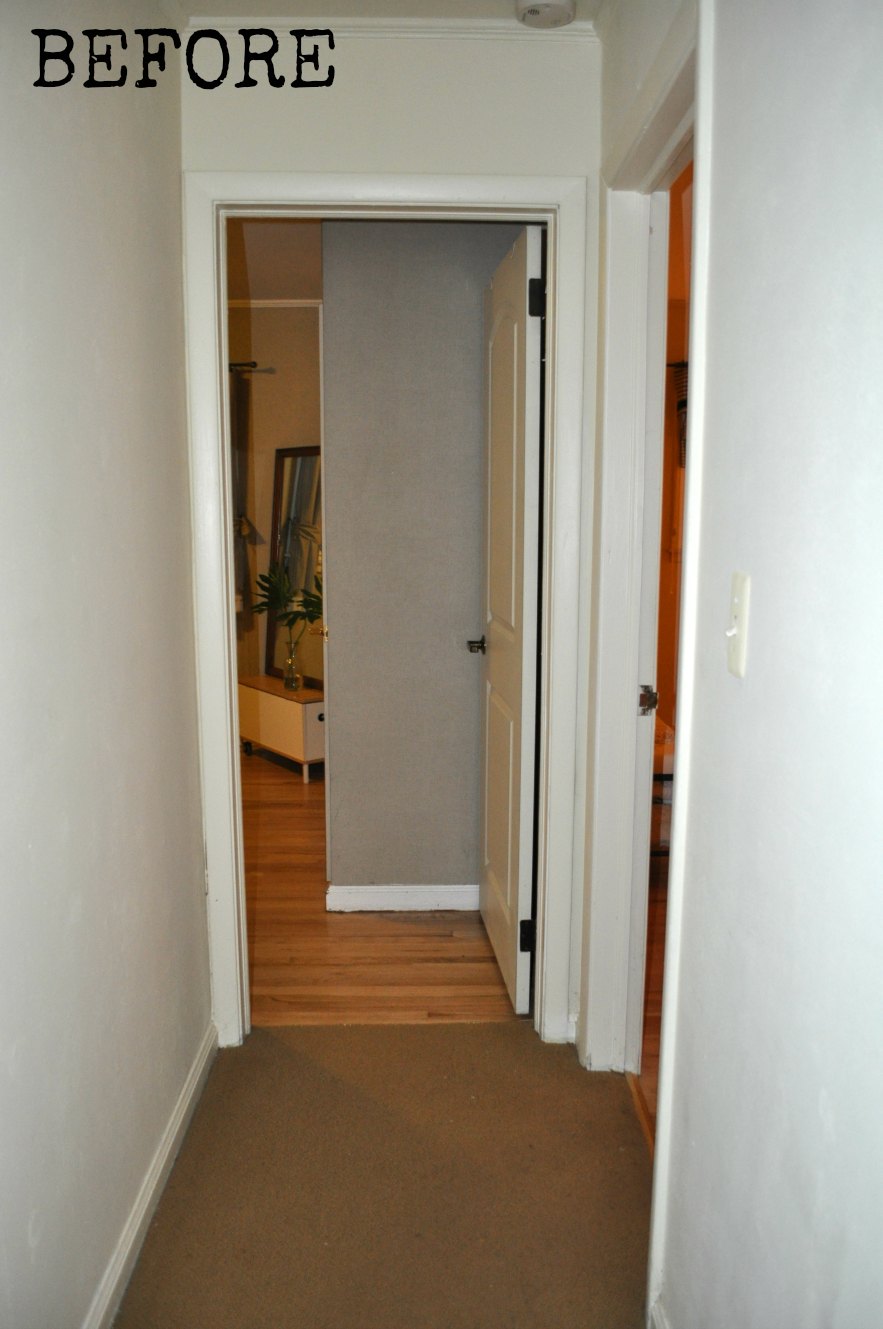
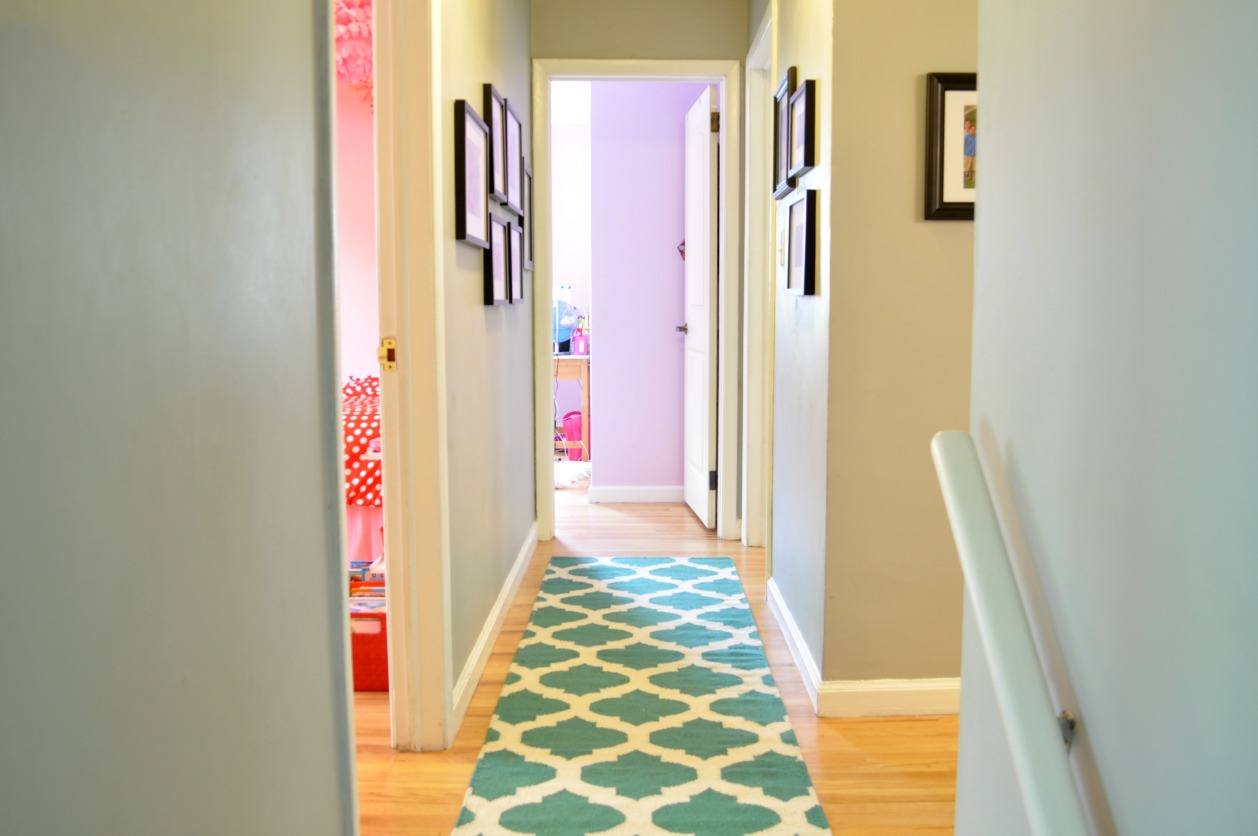
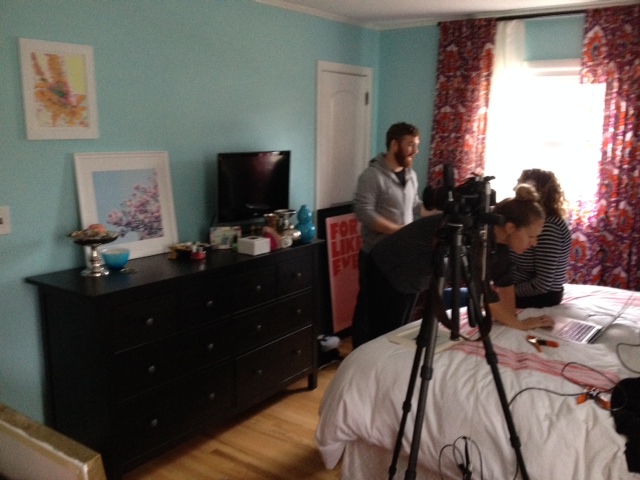
cookie pin 047

Decor, Home, My house

Sue At Home in Ladies’ Home Journal

As you may know by now, I am the Fashion Editor for Ladies’ Home Journal magazine. So when some of my fellow editors wanted to photograph a story for the April issue about bringing spring color into your home, they thought of my colorful abode and more specifically, my hot pink chair.

chair 068

My pink chair (you can read all about it here) has gotten a lot of love in the past. It’s one of my most read posts, most repinned pins, and it was featured on Emily A Clark’s blog, Centsational Girl’s Best of DIY site, and Apartment Therapy’s Room for Color. (Hey look! There it is again over in the sidebar! Click there for more living room pics.)

chair 050

But this time, it’s in a magazine. A huge national magazine. (OK. I know that I’m one of the editors so it’s kinda like nepotism but still, I’m happy to be included!)

SAH in LHJ thats my house

SAH in LHJ text

So on a chilly day in January, I was pleased to invite two of my fellow LHJ staffers and a small photo team into my home for the shoot (the zero-minute commute was kinda awesome too).

Right away photographer Jennifer Causey and her assistant got to work setting up lights and reflectors and getting my pink chair ready for its close-up. I usually prefer a neutral pillow on the chair but for the purposes of the story, editor Lauren Piro brought lots of bright spring-y options. The yellow one from Target was the clear winner.

pink chair in LHJ

Note: The chair has faded A LOT and is due for another dye job but I just couldn’t get it done before the shoot, So yes, she has had a Photoshop touch up for the LHJ final image you see below. When it gets a little warmer, I’ll be ok with dying on the deck again!

102195199

But the chair wasn’t the only image shot in my house. We also put some artwork from Society6 on my bedroom dresser and styled it with some of my jewelry.

LHJ in bedroom

Do you know what it’s like to have a photo crew, including some of your coworkers, in your bedroom on a Thursday afternoon? It’s weird, people. It’s weird. Luckily, one of those fellow coworkers is my dear friend, our very talented photo director Clare Lissaman, who always knows how to put people at ease on a shoot.

The story also featured my painted kitchen cabinet. It’s one of my favorite DIY projects in my house (you can see it up top in my header collage) but I’ve had such a hard time getting a good shot of it for the blog so that’s why I’ve never written about it.

102195197

The cabinet looks so pretty that I almost don’t notice the fugly countertops!

So how was she able to get that brighter shot in my windowless kitchen? What photo skills does Jennifer have that I don’t have? This big ass light, that’s what! (And I’m sure she has lots of other great photo skills too! But the light helps.)

loght in kitchen

That beauty totally brightened up the space.

camera in kitchen

I was totally thrilled to be included in the issue and I want to thank my co-workers for including my home and supporting Sue at Home. If you’d like to order a subscription to Ladies’ Home Journal, just click the affiliate link in my sidebar.

With the happy spring weather, I’ve decided to come out of my hibernation and I can’t wait to get some spring projects happening soon. Stayed tuned for our newly painted playroom, a new headboard, a hallway makeover and…drum roll…a complete bathroom renovation!

XO

Sue at Home