Decor, Home, Pin of the Week

Pin of the Week: Displaying Personal Pictures

I’ve always thought that the idea of limiting personal pictures in your home is so weird. (I don’t understand why this is an issue but check out this Apartment Therapy post about the differing opinions.) I mean, it’s my damn house and if I want to wallpaper it with pictures of my kids so it doesn’t look like a damn model home (gag!) then so be it! (Wow, I just got really fiesty there. Sorry.)  For me, displaying personal photos in my home supports just about every point of my Design Manifesto.

Anyway, I LOOOOOOVE this pic that I spotted this week on Dilly Dallas. Dallas Shaw posted it from her trip to Palihouse in West Hollywood. I just love the idea of filling a massive frame with a ton of pictures. I’m not talking about your standard run-of-the-mill collage frame that’ll hold maybe 9 pics, I’m talking about hundreds. And that’s a lot of pictures here, people. Let’s take a peek:

I found this other pic on the Palihouse site. I think we can confirm from this that it holds at least 308 pictures. (That’d be 14 columns times 22 rows – I’d like to thank a high school math teacher for my vast math knowledge but it was really just Google Calculator.)

palihouse

The point is, no matter how you add personal pics to your home, it’ll be a quick easy way to make it yours. Let’s take a peek at some other great personal photo display ideas.

I think this inspiration board is great and this could be a perfect way to have an ever evolving wall of pictures. P.S. Bonus points for the SICK suzani chairs.

Or you can just go large scale, like this from Nectar and Light:

More large scale prints from Sabbe Spot:

Better wallpaper Co makes oversized prints.

Even bigger: Photo wallpaper via Apartment Therapy

More wallpaper here via Apartment Therapy.

A wall-filling collage via Melange photography

melange

I just die over these massive headshots from Hillary Thomas Designs. (You’ve heard her name here before. That’s the same Hillary Thomas of the genius malachite finials and malachite bowl in the last Pin of the Week post.)

You will not believe how easily – and cheaply – Mandy at Sugar Bee Crafts DIY’d this huge picture of her girls. Click here for Mandy’s tutorial:

How about this dark teal wall (much like my living room) with big prints just pinned up with nails. I love the low-commitment of that! via Remodelista

indigo-blue-wall-white-couch

This is such a cute room (mint stripes!) and I love the simplicity of the repetitive black and whites in matching frames. It’s kinda perfect. Via Daily Dream Decor.

A DIY collage can be achieved by attaching a bunch of frames to a base. Oh…and let’s take a moment to marvel at the CUTE model. It’s my Sophia modeling (that’s right! modeling!) in the pages of Ladies’ Home Journal!

soph modeling in LHJ

I love these pics stuck up on a wall above a mantel. via Apartment Therapy from Domino

Some more oversized pics, this time in a grid. Via Tara Whitney.

Let’s take another look at the Palihouse frame. I love it and I really want to do it. BUT it’s so big and probably expensive (for the frame) and hard to change the photos and they’re all horizontal. I’m dying to do this but I need to modify it somehow. But how?

This seems a little less daunting. Via More Design Please.

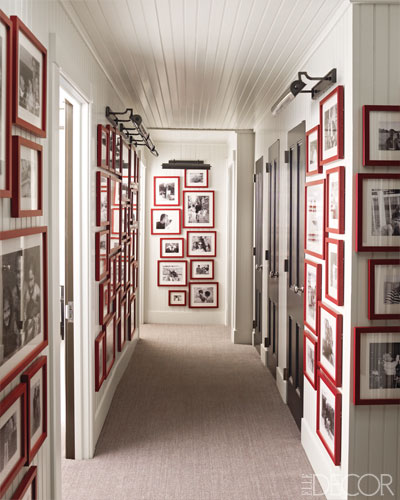
And of course, there’s always the gallery wall option. I particularly like this idea of black and white pics in all red frames. Those little gallery lights make it perfect. Via ELLE Decor.

elle decor red frames

Personally, I like to use simple candid pictures. One of my favorite pictures in my house is this one on our gallery wall. I call it Thelma and Louise. It’s a canvas print but I don’t really recommend them. I think they’re very pale compared to the original.

I don’t know about you but I’m totally inspired right now. I might go build a frame that’s taller than me or maybe I’ll buy 200 of those cheap Ikea frames and make a wall collage. Either way, I’m motivated and you know what that means…you’ll be seeing the results soon!

Tell me…how do you display personal pictures in your home? A gallery wall? A grid? Oversized prints? Just a few prints in the hall or staircase? Or are they covering your house? Tell me in the comments…

XO

Sue at Home

Decor, Home, My house

Let’s Talk About Those Copper Spheres – Part II

As you’ll recall from Part 1 of this story, we bought two big copper balls for $10 a piece at the Design Within Reach Annex in Secaucus. They were tagged as being Roberto Menghi’s Globo di Luce pendant but I’m quite sure that the plasticy burnt-out and slightly-scratched balls that we have aren’t the blown-glass originals. (A floor sample perhaps?) But even though they’re just the shell of a Globo di Luce, they’re kind of cool. Yet the question remains–what to do with them?

The original inspiration of using them as an objet was this pic from Apartment Therapy that I pinned as an idea for Pablo’s man cave.

In our house, his “cave” is actually a light filled den with a fireplace…and wood paneling. His one request: The wood paneling stays. So, my plan is to go for a swanky mid-century feel like the picture above. I love how the surveillance mirrors are used as decoration. I figured the balls could sort of do the same thing. But the problem: our rooms are small. And my balls are large. (Go ahead. Let the pre-teen in you have a giggle.) You see, having a 16 inch diameter pair of balls sticking out of the wall looks like Angie from Survivor’s boobs. I stuck one on a nail from a picture of my gallery wall just so you can see what they look like hung – even though I wouldn’t put them in this space. See what I mean?

It can also be hung by the big hole so the smaller opening is on the outside. Let’s try that. Nope…still looks like a boob. But now it’s a boob with a nipple.

Let’s try something else. Since the den has recessed lighting, I figured we could hang them from the ceiling  just as a decorative object. But the place to do that would be over the table in the den and we thought that would look pretty cool. Until we realized it looked like this from the kitchen. (See below.) Combined with my beloved Hicks pendant in the kitchen, the view became Sphere City.  (For the purposes of this experiment, the role of “Price Is Right Girl” will be played by my hubs. BTW – Did you hear they finally hired a guy to display the washing machines and boats on Price is Right? I think Pablo could have kicked his ass if he had auditioned.)

And don’t forget, I’ve got CB2’s Firefly light in the dining room. (I’ve obviously got an Orb-session. Wonder what Freud would say about that?)

We had them on either side of our entertainment center for a little while but they weren’t great there either. But looking at it now with my pink chair, I’m not hating it. (Though I do hate how it seems to bring more attention to the monstrous TV. (I painted the walls a dark color because I wanted the TV to recede, not stand out.) What do you think?

I figure I can rig them up somehow to hang them right on a wall as long as I find the right space. Maybe in the kitchen?
The living room? The foyer? The bedroom? But would it be too boob-like??

The jury is still out on my copper balls but hopefully I’ll find somewhere to hang them soon. Got some ideas? Please tell me in the comments!

XO

Sue at Home

Decor, Home, My house

Let’s Talk About Those Copper Spheres

Back when I told you the sad story about my lack of a linen closet, I let you in on the secret that makes my little house work: my walk-up attic. And when I showed you this picture, I knew there would be a question or two about those big copper balls that live in the attic right now. And I was right.

The thing is – they only live in the attic because I don’t know what to do with them. Yet. Here’s how they came to be ours.

It was quite awhile ago that I started spotting these amazing copper pendants throughout the blogosphere. I remember seeing this image and it was a truly gasp inducing sight.

A little research taught me that the designer of the pendants was Tom Dixon but at this price, they were never going to be mine.

So, when Pablo and I used a summer Friday last year to spend the day shopping for the house sans-kids (which is the ONLY way to shop P.S.), we were thrilled to stumble upon these weird slightly-burnt plastic copper-looking balls at the Design Within Reach Outlet in Secaucus. I immediately loved them for their Tom Dixon-ness. Pablo, who doesn’t know his Tom Dixon from his Thomas O’Brien, just thought they looked cool.  (He’s cute when he gets excited about design stuff, isn’t he?) Oh, and did I mention that we paid $10 a piece for them?

A little research showed us that our Design Within Reach balls were actually the originals, designed when Tom Dixon was just 9 years old. According to the DWR site, the Globo di Luce Pendant was designed by Roberto Menghi in 1968 and it’s made of hand-blown glass. So, in fact, lots of the “Tom Dixon” copper pendant pics I had been dying over could have actually been Menghi’s Globo di Luce. They’re so similar, it’s nearly impossible to tell from a picture.

Don’t get me wrong. I’m not knocking Tom Dixon. He’s an amazing designer and artist and I would give my left arm to have a bunch of his Beat Lights hanging above my dining table. Aren’t the shiny gold interiors divine? (Photo via Y Lighting)

tom dixon beat

I just think the design world shouldn’t get their panties in a bunch about Tom Dixon’s copper pendants when they are clearly a tad derivative. Anyway, let’s get back to my balls. (Insert laugh like a pre-teen boy here.) If you’re the kind of person that solves the mystery in the first act (I’m talking to you, Mom!), then you might have figured out where this is going. Did you pick up the clues? You see, I mentioned that the $10 things we bought were plastic-y and kind of burnt looking, yet the DWR site clearly states that the Globo di Luce is made of handblown glass. So, we assume that ours were some kind of store display item (I can’t imagine how fragile the actual blown glass globe is!) that was never supposed to have a lamp in it. That would explain why they were kind of charred and why they were $10 instead of $1355 like they were originally tagged for. (Did someone put a bulb in them when they weren’t supposed to?) But we figured we could hang them somewhere and just use them as an objet. (Yes, I just used the French word for object. I kinda love  it and I’m not at all embarassed using it. OK. Maybe a little embarassed.) And we tried a bunch of different places around the house but they weren’t quite right anyway. So a year later, my balls live in the attic.

Tomorrow let’s talk about a few of the ideas we’ve had for hanging them around the house.  I think you’ll agree that several ideas don’t work  because they either look like cajones or “boops”. FYI: that’s Lily’s word for boobs. How cute is that?

More balls tomorrow!

(UPDATE: Click here for the link to the second part of the story. And click here to see where we ended up using them.)

XO

Sue at Home

crafts, Decor, Home, My house

DIY: Quick and Easy Jewelry Display

I recently completed Phase 2 of organizing my jewelry (which you read about here yesterday) and I managed to find a home for just about everything–except for a handful of long necklaces.  I spun around my room scanning for a place to put them and this frame that I had sitting on our dresser jumped out at me. You see, I had put it there recently because I felt like I needed something in front of my For Like Ever poster (read more about that here) to break up the vastness of it. It’s not fancy–I just cut a piece of old wrapping paper and stuck it in the frame. Thankfully, it worked and it was all starting to look a little more like a pretty vignette rather than a massive poster propped against a wall.  Here’s what it looked like with the addition of the frame:

You’ll also notice another new little friend. That’s the teeny tiny piggy bank I bought at Daytrip Jr during our trip to Maine. Isn’t he cute?

You might recognize that wrapping paper that I used as the drawer liner from Phase 1 of The Great Jewelry Organization Project (read more about that here.) See it hidden under all my baubles?

Anyway, back to the frame.  I noticed that it was kind of long–like the necklaces–so I figured I could make something out of it. I grabbed some pretty rose-goldish nails that I had bought for a forthcoming String Art project and got to work. FYI: The frame I used was the Wood Gallery 4×6 triple frame from Pottery Barn. At 18″ high and only 11″ wide,  it’s the perfect size.  (Yes, my hammer is pink. You got a problem with that?)

I removed everything from the frame (I would not recommend trying this with the glass still in there!) and drew a straight-ish line across the top in pencil. Then I measured 1 inch spaces across the top so the nails would be somewhat uniform. As I nailed, I decided to put some a little off the line because I figured I might split the wood if I stayed on the same line. Did it come out pretty and perfect? Nope! But as you’ll see below, you can’t tell that the nails are a little lot crooked when it’s all put together.) I was very careful to make sure they were nailed in far enough to hold a necklace but shallow enough so they weren’t coming through the other side.

When I was done, I put the frame back together and started hanging the necklaces.

I’m glad I put the nails an inch apart instead of closer because I needed a little space between each necklace.

I think the little piggy likes it too!

XO

Sue at Home

Have you done any fun DIY projects recently? Let me know in the comments below!

Food, Home

Seafood Paella and A Crazy-Easy Cake

I’m back with another If I Can Make It, You Can Too recipe. As I’ve told you before, I’m not much in the cooking category but what I lack in the skills department, I make up for with creativity. (Remember the rainbow cake from the first installment of If I Can Make It, You Can Too? )

Recently, I hosted a small birthday dinner for my friend Tracy. On the menu: shrimp and scallop paella and birthday cake, of course.

The paella recipe comes from Ingrid Hoffmann of Simply Delicioso on the Food Network and I first tried it in North Carolina where I was invited to speak at a Women’s Leadership Conference at Lowe’s headquarters. On the last night of the event we ate a meal I will never forget. We were treated to a live cooking demonstration by Ingrid herself, while we ate the delicious paella that she showed us how to prepare. She was charming and funny and I hung on every word she said because I was loving the food! Then we finished with a Duff Goldman cake decorating demo and a chance to decorate our own. Like as in, one mini cake for every single person in a huge ballroom! Duff was as great as he is on TV. (Is it any surprise that Ace of Cakes is my favorite cooking show ever? I mean, it was more about decorating than it was about cooking!) Here’s the cake I decorated at the event:

But anyway, let’s get back to the paella. You can click here for Ingrid’s recipe but I recommend reducing the seafood. It calls for an insane amount and it almost overwhelms it. For this batch, which served 8 adults with plenty left over, I increased each ingredient by 50% but I kept the seafood amounts the same. I’d also like to mention that the recipe calls for Spanish dry-cured chorizo but the meat man in my supermarket recommended a Premio chorizo that was kind of soft and I think it was much better than when I had made it with the more dry, hard stuff.

I started out by getting all the chopping done earlier in the day. The red and green peppers, onion, and garlic were all chopped and put away while I ran to the Y to see Sophia star as Joy the Jellyfish in the Westfield Y Drama Camp’s production of A Little Mermaid. (It goes without saying that she was sensational. But thanks for asking!)

Then about an hour before I started cooking, I measured out the tomato paste, rice, and olive oil. I also chopped and portioned the lemon and chorizo. (FYI: My bowls – which I LOVE – are from Anthropologie. You can get the little ones here and here and the big ones here.)

As the first guests arrived, the oil, onion, garlic, peppers, saffron and chorizo went into the pan.

In less than an hour, we were ready to eat. I served a simple green salad and some ciabatta with the paella. Everyone loved it!

As for the cake, I was stumped. Knowing we were making a birthday cake, Lily immediately asked her “Aunt” Tracy what her favorite color is. (I love that even my 4-year-old knows that when you’re getting creative, you need some inspiration first.) The answer was blue.

I knew I was going to make a box mix cake with my homemade buttercream frosting from this recipe but I didn’t know what else to do. So, I sent a text to the birthday girl asking what her favorite candy is. She replied with this cryptic message: “Twizzlers, reeses peanut cups, sour patch, I’m random.”  Suddenly, I was more confused than ever.

Then I tried a Pinterest search for the most general thing I could think of: “Birthday cake”. And I worked! I started to see a bunch of pennants and since that was something I had always wanted to try, I figured I’d do it. Luckily the girls had a bunch of arts and crafts supplies out already so I made the whole thing in less than 10 minutes. (Swear!) I grabbed some paper and cut it into little triangles. Then I took some foam alphabet stickers and spelled out Tracy’s name. (One guest thought I made the letters with fondant! Ha!) Next I glued the triangles to some twine and tied them to a couple skewers that I had in a kitchen drawer. And that’s how Tracy ended up with a vanilla cake with buttercream frosting topped with blue sugar, mini Reese’s peanut butter cups and a personalized pennant.

Everyone loved the paella and the simple cake was a hit too. Happy 40th, Tra!

XO

Sue at Home

Before and After, Decor, Home, My house

I Have a Hot Pink Chair!

I have been wanting a hot pink couch or chair for like ever. Remember when I showed you all those dreamy pink pics and told you I was thinking about dying an old slipcover I wasn’t using? Well, I did it!

Here’s the best part: this renovation cost less than $10. That’s right! Ten buckaroos! How, you ask? Well, I already had the chair and a pale pink slipcover. The chair is from PB Teen but unfortunately for you, they don’t make it anymore which I think is a crime to humanity because it’s comfortable, cute and cheap and for quite a while, they were offering slipcovers in different fabrics and patterns. When I got the chair, I picked up three velvet covers: white, bubblegum pink, and pale blue. (What? I figured the chair could be used in other rooms so I wanted to have options! That’s normal to buy three, right? ) Of course, I’ve only ever used the white one.

I decided to use RIT dye in fuschia. The directions called for 1 package of dye for every pound of fabric so I went for three since my slipcover was nearly 3 pounds. I couldn’t find a bucket big enough so grabbed this color-coordinated (!!) storage bin at Home Depot and got to work. First step, fill the bucket with 9 gallons of hot water:

Then I mixed 3 packages of dry dye with 6 cups of hot water and stirred it very well until all the dye dissolved. (Note: it did not stain my measuring cup. Bonus!)

Then I added the mix to the dye bath and stirred. (Please note that I did all this on my deck and I was wearing rubber gloves. They are not kidding about the staining possibilities so take all the warnings seriously! If you don’t believe me, come and ask the few pink dots on my kitchen countertop.)

Before adding the slipcover, I pre-wet the fabric in hot water so the color would penetrate the fabric evenly. (Having the lid to the storage bin was helpful for this step because it gave me something to carry the wet fabric on.)

And then in it went! Next up, I stirred and stirred and stirred for about 25 minutes. If you’ve never pushed a sopping wet pile of velvet around with a paint stick before, I can tell you that you will use muscles you didn’t even know you had. Ouch!

Next up, I rinsed it in the utility sink (which is now pink) in my laundry room. First in warm water, then cooler until it ran clear. This was another special type of muscle torture that I wouldn’t wish on my worst enemy! Then the scariest part of all – into my beautiful new-ish washer it went! (Don’t worry. The washer came out unscathed.)

I gave it an air-only dry in the dryer and ta-dah! Here is the finished product!

My wise husband (who so kindly signed off on this project before I did it and then called it “awesome” because he knew how excited I was about it) was the one to point out the patterned pillow was a little too much. So, I stole the Je T’aime pillow (similar here) that used to live on our bed. Much better, don’t you think?

I love how the pink looks against the dark teal walls.

The color came out so even. I’m actually mad at myself for being so scared to do this for so long!

I love the way it pops in the room.

Maybe now guests will sit in the chair. They were always kind of scared of it when it was white.

Oh happy day! I have a hot pink chair!

XO

Sue at Home

Disclaimer: Please do not dye anything hot pink in your home without running it by your significant other. I’ve learned that though there are many people who like the looks of hot pink furniture, there are not a lot of people brave enough to go for it. And there are many, many more people who are terrified of it. Thankfully, my husband is comfortable enough in his sexuality to not be so concerned about a little pink in his house. (Though maybe he should because I could possibly love this chair more than I love him. Kidding, honey!)

Decor, Food, Travel

A Visit to Hidden Pond

When we recently went to Maine and stayed at Tides Beach Club, we had to make a visit to Hidden Pond, Tides sister hotel located deep in the woods. The resort is a series of free standing bungalows – some one-bedrooms for vacationing couples and some bigger cottages for families. We had read a lot about Earth, Hidden Pond’s farm to table restaurant so we decided to give it a try. The decor was so spectacular that we were smitten with the place before we ever took a bite of the delicious food. Check out this branch that was suspended from the ceiling and wrapped in twinkle lights.

The shelves above the bar were simple but stunning. And I’m guessing those are Tom Dixon pendants (or  something similar).

Two of the walls were lined with slices of logs. (The treatment that the Novogratz’s just gave to Tony Hawk’s fireplace reminded me of the decor at Earth. Check it out here.) We also loved the industrial light fixture of hanging bulbs. But the best was the beautiful chesterfield sofa that sat in front of a roaring fire.

We went back to Hidden Pond to hang out at the adults-only pool the next day. It was located in front of The Tree Spa. We didn’t get a chance to indulge in any treatments but the spa was named to Conde Nast Traveler’s Hot List so I’d guess it’s pretty good.

If you ever wanted to know what it’s like to get a massage in a treehouse, then The Tree Spa is your place.

Near the pool is one of Hidden Pond’s firepits. I was upset that we never visited at night (they bring you a basket of s’mores fixins!) but that would have meant that would have missed the amazing dessert we shared at Earth: Banana and Peanut Butter ice cream with salted caramel.  It was one of the best desserts I’ve ever had!

The outdoor bar by the pool was so cute and it has so many great ideas for modern rustic decor. Check out that woody cocktail table.

These baskets were cut in half and attached to wall the hold citrus.

I loved the huge mason jar water jug and the bark-edged bar.

I love this idea (mason jar + sand + candle) and I’ll totally do this for my beach house. (Too bad I don’t have a beach house.)

This little chalkboard cow offered a healthy treat. And then at 11:30, the bartender wiped it off and replaced those words with “Margarita” and “Bloody Mary”! I had to have a bloody, of course. (Check yesterday’s post of the picture of that beauty.)

We loved the super rustic style of Hidden Pond and I think we need to go back one day for the s’mores!

XO

Sue at Home

Check out my other posts about our trip to Maine.

Three Days in Kennebunkport, Maine

Decor Ideas from Tides Beach Club in Maine

How to Create a Tides Beach Club Room at Home

Family, Food, Shopping

Three Days in Kennebunkport, Maine

I’ve been sharing lots of pictures of the beautiful Tides Beach Club that we stayed at in Maine (here and here) but I’d like to take you off campus to show you some of the other charming things we loved about Kennebunkport, Maine. (If you’ve never been, plan a trip for next summer!)

We checked out this big fella and then ate his brothers for the next 3 days.

Our first stop was The Clam Shack where we had ended up having lunch everyday. The line was long and the food was pricey but it was totally worth it. Do they have the best lobster roll in Maine?  I don’t know but I can tell you that lobster roll was one of the best things I’ve ever eaten in my life. (Yes they do, according to the Travel Channel’s Food Wars!)

At The Clam Shack, the lobster roll isn’t your typical hot dog roll looking thing. It’s on a delicious buttery bakery roll and the lobster is just perfection. We loved the fried clam strips too (and the shrimp which we tried on day two) but nothing could beat that perfect lobster roll.

As for shopping in the harbor, it was mostly disappointing tourist traps with two big exceptions: Daytrip Society and their kid’s store, Daytrip Jr. They both carried such a smart assortment of quirky items that any tourist or local could love. (And lucky you, they have ecommerce, too!) I was particularly smitten with the kids store, pictured below. They had toys and games that I had never seen before and I had to pry myself out of there before I spent a fortune!

When we got back to our hotel, we decided to take a walk on the beautiful beach just across the street. The water was ice cold but Pablo braved it for one Nestea Plunge He’s crazy!

Before dinner, we relaxed on the front porch of Tides and while I sipped a cocktail (or three), Pablo did a Fantasy Football draft. (Yes, I allowed my husband to do a draft while we were on vacation. Yes, I am the best wife on the planet.)

The next day, we took a drive around to look at some insanely beautiful houses (check out this listing if you have 4 million dollars).  We took this picture near Ocean Avenue. I think it’s the only one we got together.

We drove by the Bush compound (ya know – cause you have to if you go to Kennebunkport or something like that) and marveled at it’s pretentiousness. I mean, they live on their own peninsula!

We also sampled the world’s greatest Bloody Mary at Earth at Hidden Pond. We spent a lot of time at the pool there. More on our delicious dinner at Earth tomorrow as well as lots of beautiful rustic decor ideas you can steal from Hidden Pond.

Pablo kept talking about how the fires smelled so great in Maine. Personally, I think it was just the idea of smelling a nice fresh fire in August. In the summer, you just forget how good that smells. But he swore it was the Maine firewood. So, when we saw this roadside firewood “shop” that operated on the honor system, we had to pick up a bundle. Check out the sign: “Camp Wood. $4.00 a bundle. Theives…” (yes it was spelled that way) “…smile for camera. I’m sorry honest people.” So, we put our money in the little cup and took a bunch.

On our way out of Maine, we did some antiquing on Route 1. We visited probably 10-12 shops so we were pretty exhausted by the end. I snapped this happy picture of Pablo as we entered our first store. (There would be no more happy pictures because he ended up listening to sports radio in the car while I endlessly hunted for treasures.) My favorite shops were the one pictured here, Antiques USA in Arundel (it was massive), Wells General Store Antiques in Wells (which had lots of 1950s diner stuff) and Columbary House in Cape Neddick where I ended up getting a cake plate with a glass dome for $35 and a blue and cream striped crock for my mom for $15.

I’m already dreaming of getting back there again. That lobster roll is calling me!

XO

Sue at Home

Decor, Home

How to Create a Tides Beach Club Room at Home

Last week, Pablo and I visited Maine for a belated anniversary vacation. We stayed at the beautiful Tides Beach Club in Kennebunkport and yesterday, I showed you lots of pics from the rest of the hotel. (I’m still dreaming of those lucite stools!) The hotel was gorg from top to bottom and we couldn’t have been more pleased with our cozy and charming room. Sure, the view was to-die-for…

…but the room itself was beautiful too. Following each picture are my ideas for getting a Tides-style room at home.

For coral basketweave textured wallpaper try here or if you prefer paint (I do!) try Benjamin Moore Picante.

The headboard with nailhead trim made such a big impact in the room. Try this beauty from here.

Teal looks great with coral. This similar wall art can be found here.

The bed was a perfect interpretation of “modern beach”.

I’m sure you know where to get crisp white sheets and duvet but I always get mine from here.

For a little pop of color, add a coral and white duvet cover folded at the end of the bed like this one.

A decorative shell pillow from here would work or for a more authentic embroidered look, make your own with this.

We loved the glossy wainscoting on the ceiling – and this star shaped light was a surprising touch.

You can find a flushmount like that here.

The room was tiny but there was just enough space for a pretty chair in the corner.

You could get the look with a white slipcovered chair from here.

Similar decorative chair pillow from here (but please don’t karate chop it like this one!)

Heavy draperies look great hanging from thick curtain rods. Curtains made in this fabric from here would be pretty similar.

For a totally coordinated look, have your man wear a matching coral shirt. It really completes the color scheme! (Sorry, I don’t have a resource for him. He’s not for sale.)

For info on booking your own room at Tides Beach Club, click here.

XO

Sue at Home

Decor, Home

Decor Ideas from Tides Beach Club in Maine

Last week Pablo and I took a quick trip to Maine for a belated 10-year anniversary celebration. We stayed at the beautiful Tides Beach Club on Goose Rocks Beach in Kennebunkport. The inn recently underwent a huge renovation, turning it into a charmingly modern interpretation of “beach chic” that still stays very close to its laid-back Maine roots.

The beautiful porch out front was always full of people (sipping coffee in the morning and cocktails in the afternoon) so I could never get a shot of it empty. Here’s a great picture from the Tides website. The chairs were so big and deep that I had to pull my feet up into them. I could barely reach the ground!

We never learned to play backgammon but that didn’t stop me from falling in love with this navy lacquered game table and white slipcovered chairs.

A bookshelf offered beautiful coffee table books to peruse while you sit under a  rope wrapped chandelier. And how about those chairs? They’re like luxe cushioned director’s chairs. Love!

I fell in love with a pair of these oyster lamps and almost considered grabbing a similar one when I spotted it in Antiques on Nine, a Kennebunk shop. But then I saw the $795 price tag. No thank you.

I was absolutely smitten with these thick crystal lamps. Clearly, good lighting makes me weak in the knees! I also loved the weathered chest though I wish there wasn’t another one just like it nearby. (The repetition made the weathering look obviously fake. Know what I mean?)

There was classic wainscoting everywhere – on the ceilings, up the stairs….

The restaurant side of the main floor was sleek and modern but still totally beachy. (And yes, I’ll be giving you a closer look at those lucite stools in just a moment. Please try and be patient!)

I can’t believe it took me 2 days to notice my beloved Hicks Pendants hanging in the porch section of the restaurant. (We have the bronze/antique brass version in our kitchen. I think theirs were the polished nickel. And MUCH bigger than our little one!) They’re gorgeous in any size or color!

I wonder if this doorway detail was original or if it was found in an architectural salvage place. Either way, it was a beaut!

I kept rubbing my hands over the divine carrera marble bar top but the bartender told me it’s a bitch to keep neat. It’s so porous that every drink ring remains and don’t even think about getting any citrus near it! He showed me a bleached out spot that a lemon wedge left behind. They had to have it completely sanded and refinished within a year of getting it. I’m still in love with carrera marble (have been ever since we got these tiles in our bathroom) but I think I can give up my dream of having it as a kitchen counter. High maintenance and I are not  friends!

Even the drinks are pretty at Tides. I can assure you that my Blueberry Fizz was as delicious as it looks!

Let’s take a moment to talk about those  gorgeous lucite stools! I seriously would have tried to slip one into my clutch if they weren’t so heavy. (Only a woman drinking too many Blueberry Fizz’s would think she could sneak out with a stool!) But seriously they were absolutely beautiful and the visual break allowed for you to see all the way to the tufted bar. It was all truly a work of art.

Speaking of art, check out the photos from a Kennebunkport photographer that were hanging in the restaurant. It’s dogs hanging out of car windows! Aren’t they so sweet? The photographer is Christopher Becker and the collection is perfectly titled Canine Bliss.

While the doggies hung in the restaurant, the hallways of the hotel with filled with matching frames hung in a perfectly haphazard “pattern”. What was in the frames you ask? Random stuff. Personal family pics (whose family? I don’t know!), interesting modern art prints, fashion magazine pages (bedazzled with glitter glue!), and even some vintage images. I love the way it looked (it kinda reminded me of John and Sherry’s hallway) and it inspired me to finally hang something in our lackluster hall. Hopefully, I’ll be getting on that project soon!

I hope you enjoyed the tour of Tides Beach Club. Tomorrow, you get to see our charming, cozy (ie: small) room complete with resources to create a Tides-style room of your own. See you then!

Did you take any fun summer vacations? Do tell!

XO

Sue at Home